|
Inspections that Prevent Restoration Efforts
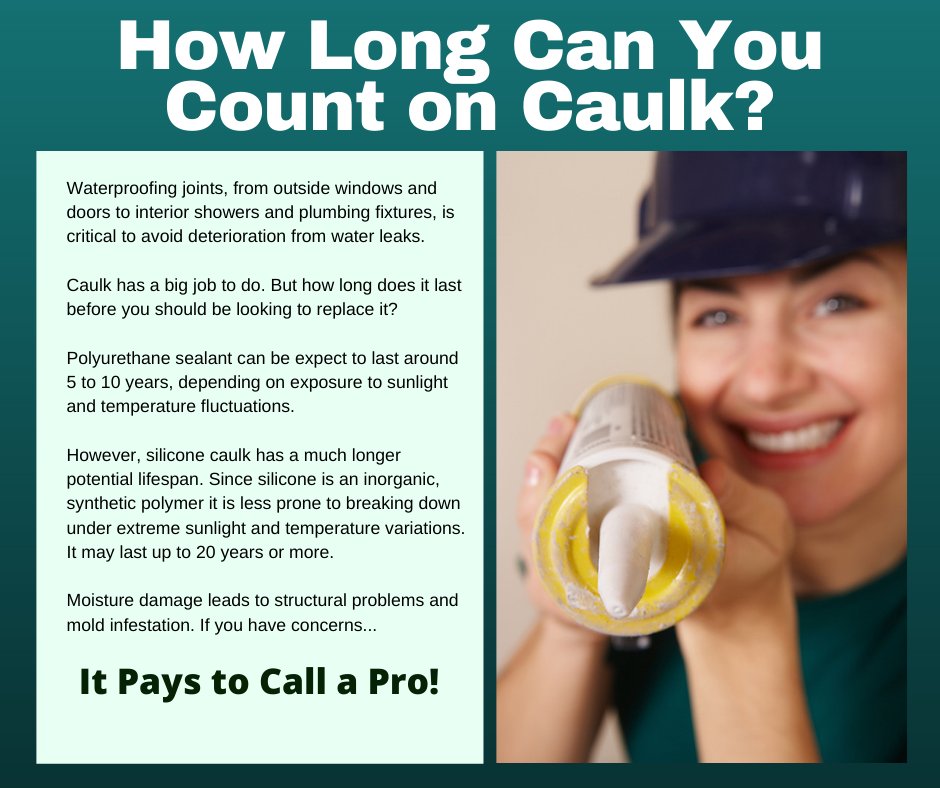
As we look at spring in the rear-view mirror of life, it’s time to think about what a tough winter and spring season may have had on our home. Now is the perfect time of year to take a stroll around your home and see how things look. Yes, you may have already put in a few plants and run the lawn mower a time or two, but have you really looked closely at the exterior of your home? What you may discover — and subsequently repair — will keep the weather elements outside and your home safe and snug inside. Go ahead, put on your shoes and head outside. Scroll around the house. Here’s what you should look for. Roof Stand back and really look, even with a pair of binoculars. Do you see any shingles or other roof materials popping up a bit? Look at transition areas. Any damage you see just might be covered by insurance, especially if there was a recent windstorm. Any damage should be repaired immediately before you suffer from water intrusion. Roof damage is really serious business. Gutters Freezing temperatures, age of the gutters, and the elements can take their toll. Get underneath the gutters and look up. Do they pull away from the home? Look for daylight between the gutters and the roof. You don’t want to see that. And the next time it rains, grab an umbrella and take another tour outside — except when there is lightning! If any water is spilling out the side of the gutter, it’s time for a closer look. Siding Standing at each corner of the house, look along the side. There are many types of siding materials but what you want to look for is anything wavy, not flat like it should be, and perhaps pulling away. This might mean a repair job is in order, and you should do it before the next storm. Caulking Around windows, doors, and ventilation pipes, the caulking should be in good condition, not cracked and damaged. Caulking can easily be replaced but be sure to purchase a caulking product intended for your purpose, such as one that can withstand outdoor elements and wind/rain. The experts at a home improvement store can point out what’s best for your situation. But no matter what happens to your home during any type of storm, you have professionals ready to help. Do the right thing and reach out to your favorite disaster restoration company. After all, it pays to call a pro! What the EPA Says About MOLD
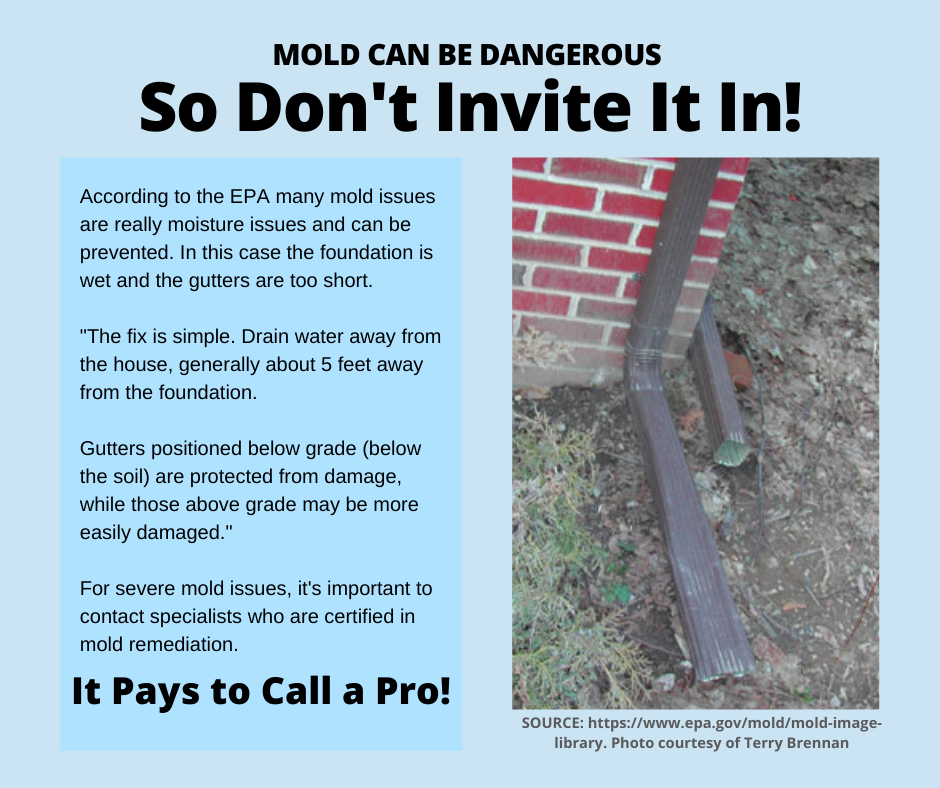
When the United States Environmental Protection Agency, or EPA, speaks… most of us listen. And the EPA has much to say about mold, which can affect health in minor, irritating ways (slight respiratory issues) to severe life-threatening reactions, resulting in medical care and the unthinkable. Here are the edited highlights from the EPA.gov site, along with our own thoughts, that all households should consider. Of course, the EPA recommends that everyone should fix plumbing leaks, water intrusion issues, and keep all interior surfaces clean and dry at all times. If you do this, mold should not be an issue. But if it happens, here are some tips. Mold cleanup Who should do the cleanup? There are a number of factors. First, consider the size of the mold problem. If less than 10 square feet, you may be able to handle the cleanup yourself. However, with water damage and mold growth more than 10 feet, consult an expert. And there is no way to know 100% if even a small amount of mold could have an adverse health effect on you or those you care about. HVAC and air conveyance systems Don’t minimize the impact that mold can have in your ductwork or other air conveyance areas. Hidden mold may be out of sight, but it should be taken seriously. Slight musty odors should trigger an investigation. Get your duct work inspected immediately and have the work done by a professional. Restrooms, shower stalls and more Mold is normal in some areas, like in the corner of a shower stall. Don’t panic. Just clean it up. But if you need help, hire a pro. A very small amount of mold is no doubt fresh and can be easily removed. Hiring a pro If you decide to contact and use a disaster restoration company or a mold removal service, be a smart consumer and check their references and credentials. There are many “companies” that claim to be experts in mold removal, but they are far from qualified. Do the right thing with mold. When you know you have it, you should know how to get rid of it. The easiest, best, and safest way is to let a disaster restoration, water damage, or mold remediation company do the work. After all, it pays to call a pro! ‘Do Not Do’ Activities After a Water Damage
Broken pipes, leaky roofs, plugged up drains, wind-driven rain, and other issues can strike at any time, especially during spring weather. When water intrudes, you want to clean it up, and fast. Most homeowners call their favorite disaster restoration company, but while they wait, they find it very difficult to do nothing about their unfortunate situation. Some may attempt to vacuum up the water, get out all the fans, rip out wet sheetrock, and other tasks that need to be handled — at least in the minds of those affected by a disaster. It’s really tough to sit by, wait, and do nothing in a situation like this. But often, that’s exactly what you should do. Nothing. Make the phone call to your restoration company and get their advice and wait for them. With this in mind, consider these definite “do not do” activities in the event of a water damage situation. Do not vacuum up any water with an ordinary vacuum cleaner (yes, it’s been done and not with good results) and it is best to avoid even a wet/dry vacuum. If you must do some water extraction yourself, make sure it is a professional grade piece of equipment, such as something you might rent, as there are safety considerations to keep in mind — such as avoiding electrocution. Don’t use electrical appliances, even ordinary ones that might seem harmless, when in the vicinity of flooded areas. Make sure any power cards are properly grounded in your home. Don’t go into heavily flooded rooms if you can, don’t walk on wet carpet or through flooded areas, such as a basement. Again, the electrical issue can be a factor. If the flooding is limited and you simply have a squishy carpet, you may be able to move around the home, but only after you have made certain power is turned off in affected areas and there are no safety concerns. Don’t start pulling apart building materials, such as sheetrock, or removing carpet, as you might make a bigger mess that will make more work for the restoration company that is on its way. Small injuries can quickly become infected injuries. Don’t wait! Disaster restoration companies work 24/7, 365 days a year. It’s the nature of disaster work. Do the right thing, and give your favorite restoration company a call the minute disaster strikes. After all, it pays to call a pro! Pipes that (Usually) Freeze First
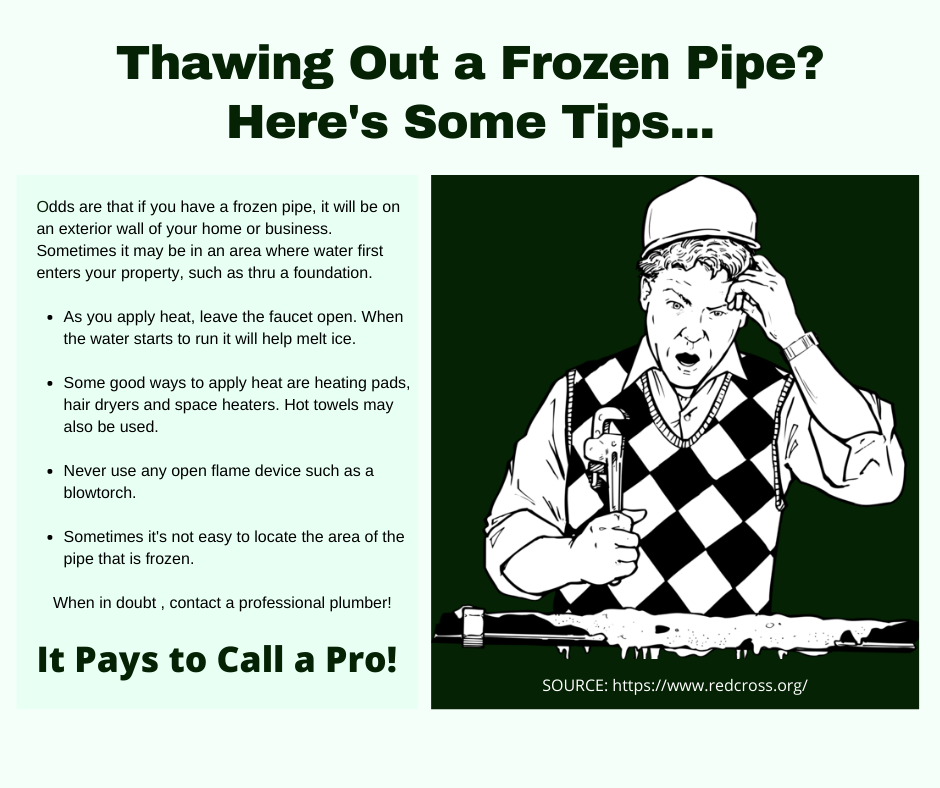
When pipes freeze, they create havoc that is time consuming and expensive. Your home is full of all kinds of pipes, including fresh water pipes that supply your bathrooms, kitchen, laundry room, and more. These fresh water pipes are under pressure, and if they freeze up, they can burst and create a huge mess that must be cleaned up quickly. You might have heard some say that hot water freezes faster than cold water. If you do a quick Google search, you will see all types of references to this topic. You might have seen videos of people throwing hot water up in freezing air and it freezes instantly, creating ice crystals. But no matter what you personally believe, one thing is accepted as true among many disaster restoration professionals: Hot water pipes freeze and break faster than cold water pipes. This statement isn’t based simply on water temperature. It’s based on the makeup of the water, and some studies show that hot water contains more dissolved gasses, and those chemical particles crystalize first. Many restoration professionals will tell you that they have been on many water damage jobs where the hot water pipe was broken and spraying water, while the cold water pipe was fine. And at the same time, many have experienced hot water spigots doing nothing while their cold water companions, just within inches of each other, work just fine. There are many articles about what is called the “Mpemba” effect, that warm water freezes faster than cold water. While it makes for interesting reading, the main takeaway for you is to make sure that no pipes in your home ever freeze. You can do this with some planning. The best solution is to make sure your pipes are wrapped with heat tape or insulation, combined with ensuring no cold drafts are allowed into walls or cavities in your home. Another preventive step to take is when the temperatures really dip into the sub-zero range, and especially if you have had pipes freeze in the past, consider allowing them to drip during extended times of not being used. Yes, this will run up your water bill a bit, but it is definitely cheaper than a devastating pipe break and resulting flooding. But if the unthinkable does occur, and a pipe breaks and damages your home, do the right thing. Call your favorite disaster restoration company. After all, it pays to call a pro! Prepare for Spring Flooding
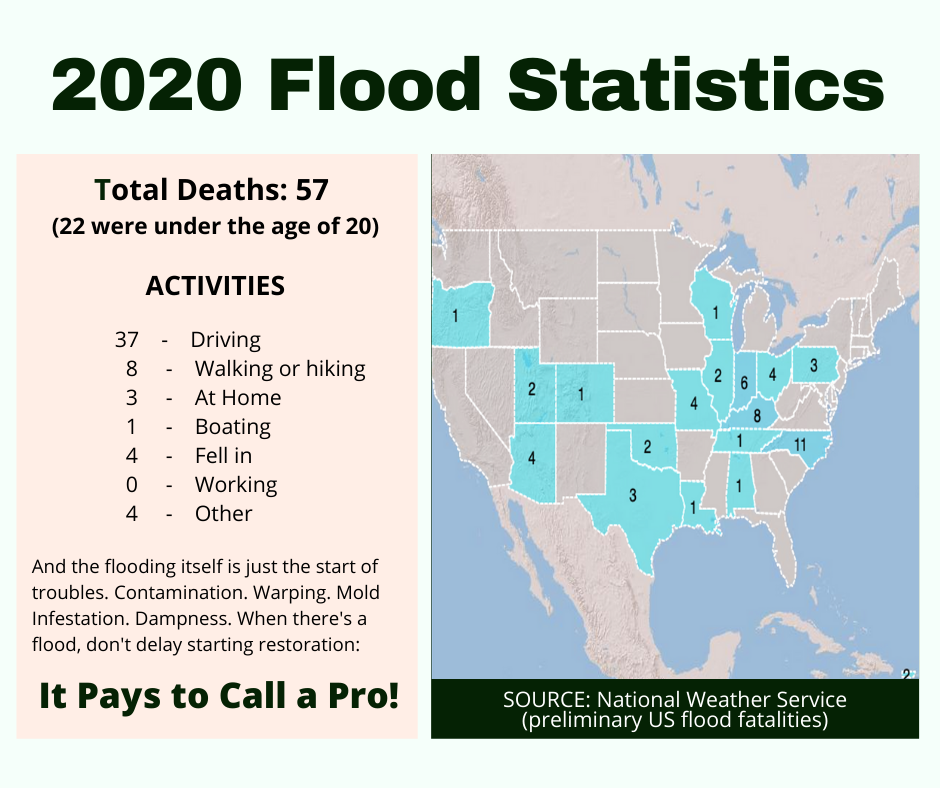
At the end of every winter, we might forget about the previous spring rains and subsequent flooding that might have occurred in the area. But when unrelenting rain starts to fall, one thing you don’t want to experience is regret in not being prepared, whether it is from leaks related to your roofing, windows, or the possibility of a flooded basement. While those might seem like minor issues, when they happen to you, they quickly move up to disastrous. Making sure your home is safe, secure, and devices like your sump pump (if you have a basement) are in good condition. But when heavy rains hit your area, and flooding is a possibility, the website ready.gov has some great advice for your preparedness plan. Make a plan This is important to do in advance, as when an emergency strikes you will be in panic mode. Have a discussion with family members, about what you will do, where you will go, where you might meet up if separated and mobile phones are not working. Be sure to discuss your pets as well and have a plan for them. Human life is invaluable, and we feel the same way about our pets. Have a written list of important phone numbers in case your cell phone loses charge or isn’t functioning. Build a ‘go-kit’ Have the necessities in a backpack or other easy-to-grab bag. Necessities include documents, such as birth certificates, passports, legal documents, and other papers you should not lose. Having some cash is important in the event credit cards can’t be used. Clothing, medications, and other necessities should also be in your ‘go-kit’ supplies. Basically, think about what you simply can’t go without for several days if you have to be out of your home. Check your insurance policy Now is the time to make sure you have coverage for natural disasters that might strike your home. Don’t assume. Ask your insurance agent and make sure you have it spelled out clearly in your policy. Not all natural events are covered by regular homeowner policies. But if the unthinkable does happen to your home, and it becomes damaged by any disaster event, do the right thing and get it all fixed quickly — and safely. Doing the cleanup yourself can expose you to future potential hazards. Call your favorite restoration company. After all, it pays to call a pro! Cleaning Soot from Surfaces
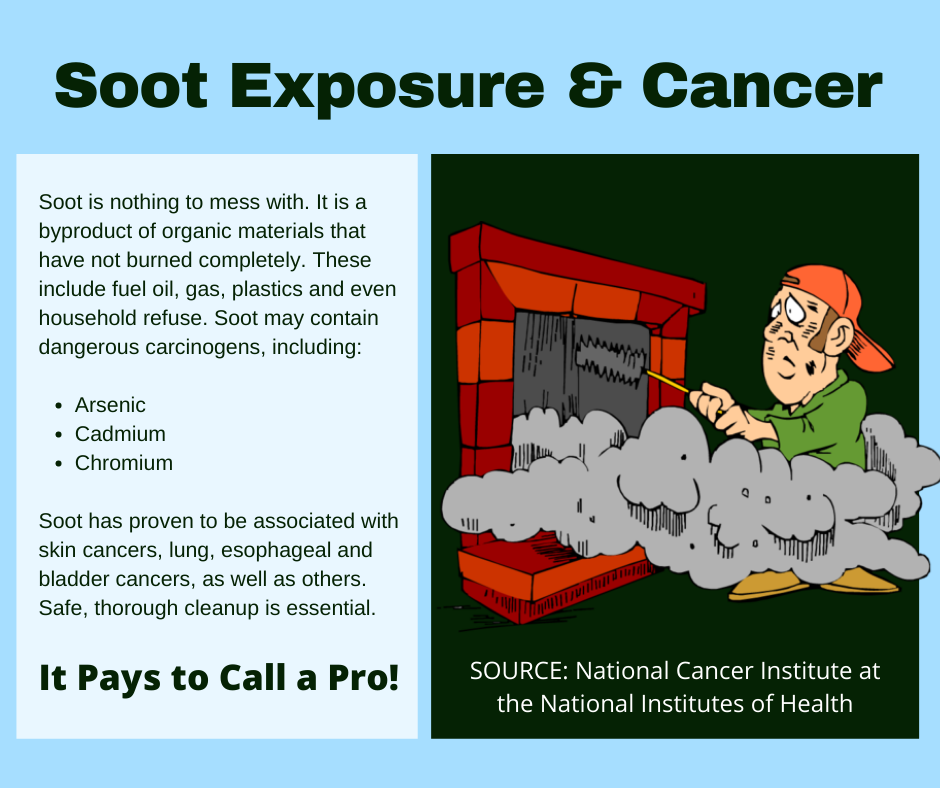
Soot is a residue that can be on any surface in your home. It can come from sources such as your furnace system, a fireplace, candles you burn, and other combustible sources that don’t burn clean. Some soot is dangerous, such as from a fire or furnace puff-back. Skin contact with these types of soot should be avoided, as they may contain hydrocarbons that are classified as human carcinogens. Outdoor soot is even regulated by the EPA, classified as a criteria pollutant. Soot is usually handled by restoration professionals as it is often a by-product of a disaster event, although it may be minor, such as extra smoke from a fireplace. But many types of soot, such as found in your kitchen or from candles, light soot, can be handled with regular restorative cleaning. Just be smart when deciding to clean soot from surfaces. Wearing appropriate personal protective equipment is a must when restoration pros do it, so keep that in mind and wear protective gloves, eye protection, and anything you need to keep the soot residues off of your skin and out of your lungs. The first step with soot is with simply dry wiping. It may come off the surface easily, especially if the surface is non-permeable. You will still need to wet clean that surface for final residue. Most likely, the soot needs to be cleaned with hot water and detergent, since it is often greasy. Applying some detergent solution and allowing approximately 10 minutes of dwell time should loosen the soot and you can wipe it away. There are also special cleaning products for soot-type greasy soils. The same cleaning principles would apply. But if the soot is on a vertical surface, your approach needs to be more careful. Clean from the bottom and move up, just a few inches at a time. If you start at the top and work down, any wet residue that runs down the wall may create permanent stains. So manage the moisture and soot removal from the bottom going up, and you won’t have this issue. If, after cleaning, soot stains remain, it may be time to think of repainting. Of course, soot cleaning is really something that restoration pros can handle. Do the right thing. Call your favorite restoration company. After all, it pays to call a pro! Wonderful Wood Floors
Cleaning and maintaining hard surfaces is a task that can really enhance the appearance and value of your home. While most hard floors respond well to routine cleaning and maintenance, there are still challenges inherent with natural wood flooring materials that require your special attention. The first challenge is a gritty one. Speaking of soil, of course. Any type of soil on a surface acts as a natural “sandpaper” and slowly but surely damages the surface as it is walked on. This can happen to carpet and hard floors, but it’s the appearance of hard floors that will show the damage. Imagine putting some sand on plexiglass and walking on it for a long period of time. The surface is going to get scratched and you will see it. The same is true of hard floors. Carpet may hide the issue to some degree — hard floors do not. The key to protecting your wonderful wood floors is daily maintenance. Don’t let a day go by without sweeping or, even better, using a dust mop on the floor. It doesn’t take long to do this, just a few minutes, but keeping that gritty soil off the floor will protect it. Choose a quality dust mop wide enough to make quick work of the chore, but not too wide that you can’t get into tight areas or corners. There are special vacuum cleaners for hard surfaces that work great as well. At least once a week, completely clean your wood floors. This means after removing the dry, gritty soil, deep clean the floor with warm detergent solution. Choose a detergent for your type of floor. A quick online search should provide you with the best product type. Keep moisture to a minimum but enough to dampen the floor as you clean it, removing oils and contaminants as you work. Rinse out and repeat several times until you are confident your wood floors are “squeaky clean.” When you come across specks or soils that stick to the floor, scrape them off with your fingernail or a sharp blade, but be careful not to scratch the floor. Of course, the best way to care for your wood floors is to use experts who know exactly how to maintain them. Contact your favorite cleaning company today. After all, it pays to call a pro! Grease Fires During the Holiday Season
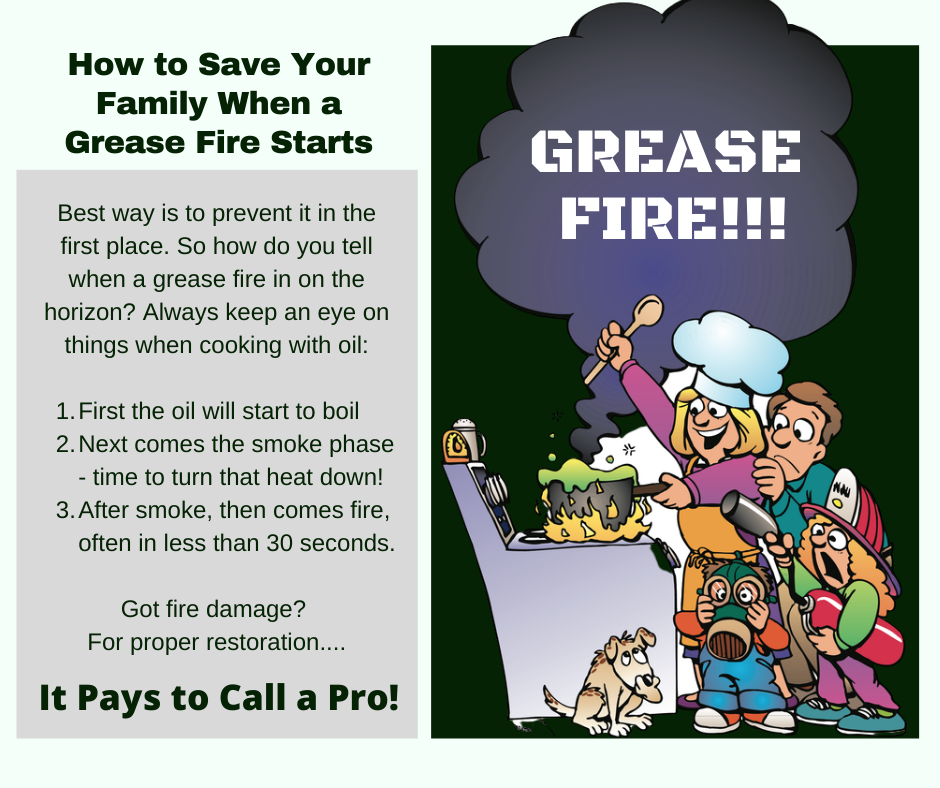
If there is one event to avoid at all costs, it is a grease fire in your kitchen as you prepare delicious meals during the holiday season. But it can happen. You are working feverishly around the kitchen and you have something cooking on the stovetop. The temperature reaches a critical limit, a flame pops up, and soon gets out of control. Another issue is when cooking grease or oil inadvertently escapes the pan and hits an open flame, and that flame follows the grease or oil trail back to the pan. Panic can strike and you may overreact to the event, and even cause more harm than good as you attempt to put the fire out. Preventing grease fires is fairly easy as long as you remain in the kitchen while cooking and stay alert to the level of flame on the stovetop and the temperature you are using to prepare your meals. Stir carefully and avoid spills at all costs. Monitor any excessive smoke coming from the pan as that is often an indicator of something to come. But when a grease fire does occur, keep calm and implement these practical tips. Control the heat When you detect smoke, turn off the heat source (whether gas or electric) and very carefully remove the pan from the burner if it is electric, if possible. But if you see a flame, do not move the pan. You will most likely splash grease or oil and fuel the fire even more. Never use water to put out a grease fire. This will splash and cause the fire to spread. Starve the flame If a flame is visible, very carefully put a lid on the open flame. This is the best, safest way to extinguish the flame as it will be starved of oxygen and go out. Extinguish the flame If a fire does start, and you can’t cover it with a lid to starve it of oxygen, you can pour baking soda on the flame until it is extinguished. If the flame grows, use an appropriate fire extinguisher for kitchen grease fires. Check with local fire authorities if you aren’t sure which type to purchase. If the unthinkable happens, and a grease fire does get out of control and cause damage, you will need special restoration work performed in your home. Do the right thing and reach out to your favorite disaster restoration company. After all, it pays to call a pro! |
Swanson Brother's Restoration - Cleaning Camden NJArchives
July 2023
Serving the Camden NJ Area. Including Cherry Hill NJ, Cinnaminson NJ, Borden Town NJ, Trenton NJ, Delran NJ, West Hampton NJ
|
 RSS Feed
|
|
Would you like to get your own OutPost Site? Cleaning and restoration firms who are MarketingZoo.com members get
|
CleaningOutpost.com Directory of Cleaning & Restoration Businesses is a service offered by MarketingZoo.com
Copyright 2015 Thinkshortcut Publishing, LLC
Copyright 2015 Thinkshortcut Publishing, LLC