|
Does Carpet Cleaning Kill Fleas?
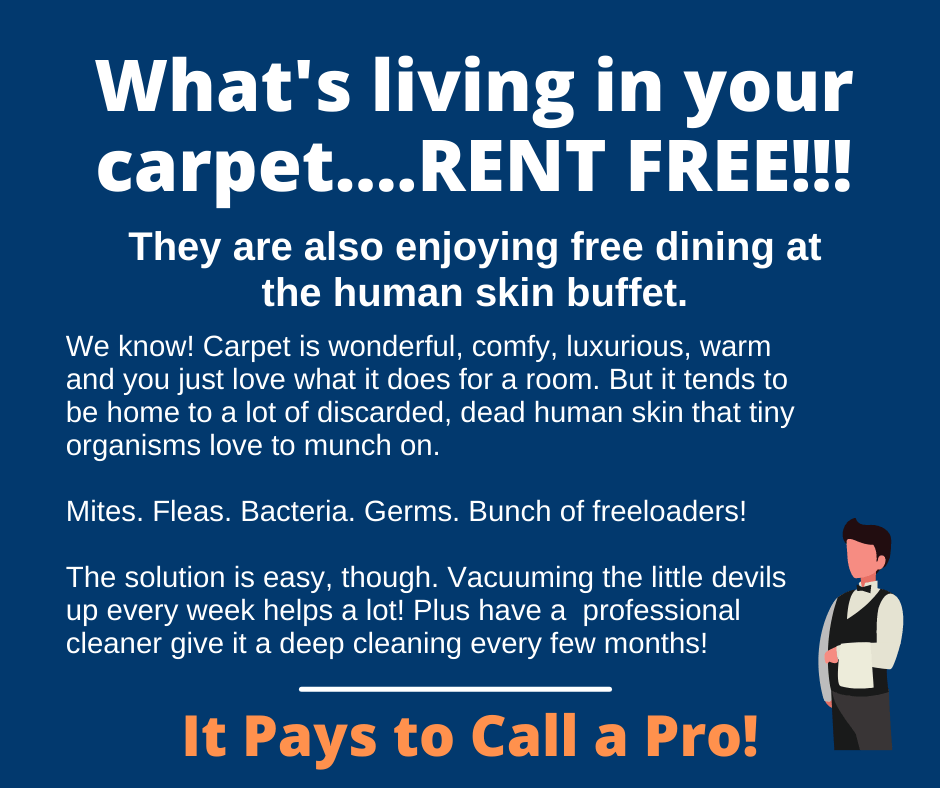
With spring weather comes all types of pests, from those emerging from hibernation to those who thrive in warm weather. And some of them end up where they don’t belong: In your home. One pest that tends to really stick around when it invades your home is the flea. The world has some 2,000 types of fleas, and they are found virtually everywhere. And when you spot one, you might notice how fast they are. They are said to have an acceleration rate some 50 times faster than a rocket. They seem to fly, but they are really jumping, and more than a foot in distance at times. Fleas live by consuming blood, as their main meal. If you have a dog or cat, which is a flea’s best friend and food source, and your pets go outside, odds are you will face a flea in your home from time to time. And even if you have no pets, they can attach to you when you venture outside and come back in. The big question is, how do you get rid of fleas? Many feel that laundering items and deep cleaning the home will do the trick. And since your pets lay on the carpet, a good carpet cleaning should kill fleas. That’s not entirely true. Fleas are tough. If you try to submerge one in water and let it go, it will pop out and survive. If you clean a surface, normal soap and water won’t kill them, either. While steam cleaning a carpet may kill some fleas, there is no guarantee that the entire flea infestation will be handled. You must remember that, depending on the state, province, or area you live in, killing fleas falls under the pesticide umbrella. A licensed pest control expert is the best qualified professional to handle a flea infestation issue. That doesn’t mean there isn’t value in having your carpet cleaned, especially by a professional. A thorough, professional deep cleaning of your carpet will physically remove many contaminants, from soils to bacteria and even fleas and their larvae. The hot water, detergent, and physical action of cleaning flushes them out. What you have remaining is a nice, fresh, clean carpet. And don’t forget to launder other items that may have fleas. It's especially important to have your home cleaned after the pest control expert has done his work. Do the right thing. Call your favorite cleaning company with any questions. After all, it pays to call a pro! Dust Control Made Easy
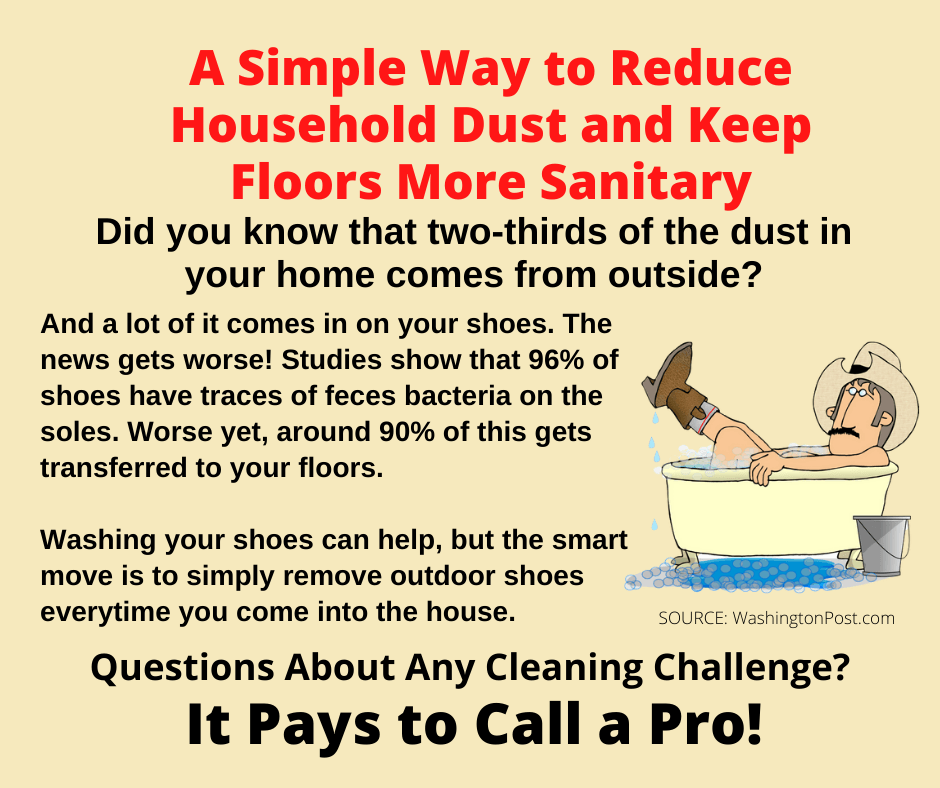
The amount of dust that builds up in a home varies greatly from one house to the next. Even the most fastidious of homeowners will have dust somewhere in the house. Dust itself is complicated because it can come from many different sources. It can be skin cells, pet dander, fibers, soot from your furnace, pollen, even particles known to be carcinogens depending on the air quality where you live. Think about this: Every time you cook something, you put particles in the air, and it has to land somewhere. Dust. You can’t avoid it. But you can remove it. Here are a few tips to create a dust-free home (well, almost dust-free). Top to bottom Most of the time, the best, efficient method to clean is from the top down. It’s how the pros do it and it is a good way to avoid having to clean surfaces twice. Let gravity be your friend. Using quality cloths also traps dust and particles so that will help in the cleaning process as well. Reaching really high surfaces, such as on the top of cabinets or the top of ceiling fan blades, requires special extension tools. You can always grab a ladder, but think safety first. Using a tool to reach high areas is safer and works great. Stuff you need Besides extension tools and quality cloths, using microfiber cloths work well for most because the cloth itself grabs soil and dust and holds onto it. The construction of microfiber cloths positively charges them, which attracts the negatively charged dust. Think magnets. It works! Plus, you can wash microfiber cloths and use them over and over again. Some prefer natural materials, such as lambswool dusters or cotton cloths. That’s fine, they all work, it just depends on what you want to use. Compressed air may be necessary to reach into crevices where a cloth or tool just won’t work. A good vacuum is another tool that helps. With special attachments, vacuuming surfaces picks up dust and collects it all in the vacuum bag. Keep it dust-free When you are done, you can also rub a dryer sheet onto surfaces to keep dust from sticking. Many do this with their baseboards, which are very susceptible to dust since they are close to the ground. And don’t forget, when you need cleaning done right, do the right thing. Call your favorite cleaning company. After all, it pays to call a pro! Toilet Brush Choices
While toilet brushes are rarely a hot topic at meetings, parties, or social events, they are extremely important in every home, building, and facility. Without toilet brushes, especially of high quality, the situation in the restroom can get downright messy — really fast. Cleaning the restroom is not a chore many people look forward to, but it is a necessary task. Cleaning the toilet or commode is something you need to do regularly, because if you skip it, even in the short term, the “buildup” will be something you will soon regret. Even with the very best toilet cleaning products or chemicals, applying them does help with cleaning… but without a way to scrub the inside of the toilet, your success will be limited. A quick internet search will reveal that you have many options when it comes to toilet brushes. You have long handled brushes; short-handled brushes; plastic; metal; wood; stainless steel; anti-slip grip; extended reach; and many more. And that’s just the handles. For brushes, you can choose from silicone; natural; yarn (which can be natural or synthetic); even disposable. The material used for scrub brushes is extensive. The main thing is to choose one that works for you. Consider how often you will use them, in how many restrooms, the type of chemical for cleaning. Obviously, the more caustic the cleaning chemical, the more damage to natural materials. Don’t skip the brush holder, either. It needs to completely encase the brush but also be able to breathe, so it can dry out. It needs to be stable, secure, so it doesn’t fall over. Keeping the entire toilet brush/holder ensemble clean and disinfected is the way to keep everyone healthy. Online reviews are a great way to find what’s best for your home. When you find the very best combination of toilet brush and holder, nothing lasts forever. A good rule of thumb is to change it all out every six months. A synthetic combination will last longer than a natural material combination, as synthetic material isn’t as absorbent, but all materials should be occasionally replaced. Bacteria can build up in the tiniest of crevices and even the most diligent homeowner can miss potentially harmful contaminants. Of course, when it comes to anything related to cleaning, it’s always best to consult with your favorite cleaning company, and use them for the toughest challenges, such as your carpet and furniture cleaning chores. After all, it pays to call a pro! How to Remove Ink Stains from Clothes
Has this, or something similar, ever happened to you? You put on a nice, fresh shirt and head out the door. When you arrive at your destination and are chatting with friends or colleagues, someone points at your shirt and asks, “What’s that?” You look down, and a small blue or black spot is starting to grow. That’s right, the ink pen in your pocket is leaking. Or perhaps your nice, fresh shirt or other item of clothing has a small spot on it, and you learn it was from simply touching an ink pen to your shirt and the ink transferred to it. It’s small, but everyone sees it. An embarrassing moment, one you wish you could have avoided. This type of stain doesn’t just wipe off. It takes a lot of effort to remove an ink stain, and if you don’t do it right, you will just make the situation worse. Ink spreads and migrates out, creating a bigger stain as you work on it. While not an easy task, here are some tips to make ink stain removal a little easier for you. But remember, this isn’t typical cleaning, it’s aggressive, so there is always the chance of damaging the fabric. Hair spray: Using an aerosol version, alcohol-based, apply liberally to the stain. Work it in and dab at it with a white paper towel. Hair spray sometimes works because the alcohol disperses some inks. Wash immediately. Acetone: The ingredient in traditional nail polish removers, acetone is a very dry solvent that will work on ink. When you saturate the ink stain, it will dissolve and migrate so be ready for that, working your way from the outside in, to limit spreading. In addition to acetone, other liquid dry solvents, such as rubbing alcohol, can be used. After application, wash immediately. Detergent treatment: Use a product meant to pre-treat laundry and apply to the ink stain liberally, work it in, from the outside in to limit spreading, and then wash immediately. No matter the type of treatment you use, washing the garment will help remove more of the ink. Be sure to wash separately, and do not dry the garment until you are satisfied with the ink removal results. When you dry an item of clothing, attempting to remove more of the stain is often futile. And remember that true fabric cleaning experts know how to remove ink stains. When you have a challenging cleaning situation, do the right thing. Call your favorite cleaning company. After all, it pays to call a pro! Cleaning Up the Medicine Cabinet
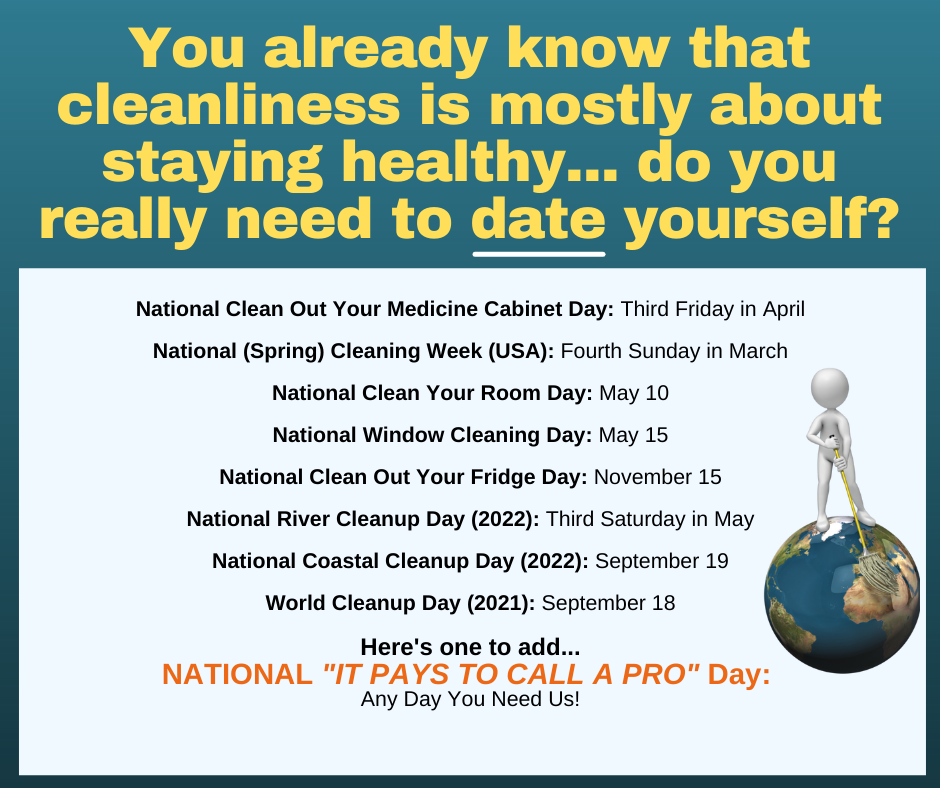
Although springtime is generally the accepted time of the year to clean out the medicine cabinet, it is something you should do on a more regular basis. Medications, drugs, and other items can expire between annual cleanings, and it’s important to keep on top of what makes you healthy and happy. If you take a peek inside your medicine cabinet, you will find all types of items, some of it medicine, some of it not. Look at all expiration dates, from prescription drugs to over-the-counter products, toothpaste, sprays, and more. Here are a few quick tips to consider as you start rummaging around in your medicine cabinet (or wherever you tend to store your products): Date check: Look at the expiration of everything in the cabinet. Although it is generally accepted that the expiration date is usually before items become obsolete, it’s safer to go by the date. Discard any items beyond the expiration date. Quality: Look at how your items are stored. If not in airtight containers, the quality may have taken a hit. Look at the color, check the consistency… is it the same as when you purchased these items brand new? If not, it’s time to replace them. Unmarked goods: Some people like to put things in baggies and other containers that aren’t marked. If you aren’t 100% sure of what’s in that baggie, discard it. Be safe. Discarding items: Just throwing drugs, pills, and other items into the toilet is a bad habit. Flushing it away might damage the environment. Instead, properly dispose of any items that you are replacing in the trash, preferably in a sealed bag in case the trash spills or moisture gets into what you are discarding. That can cause an unwanted reaction (rare) or create an odor (more common) that you might find distasteful. The big picture: Although items that are beyond their expiration date may not harm you if you use them, they may not help you, either. The effectiveness of the item diminishes over time, and if you consume products that aren’t helping you, you are wasting your time. And when it comes to cleaning anything in your home, it’s always a good idea to consult a cleaning expert. Call your favorite cleaning company today with any questions you have. After all, it pays to call a pro! How to Fix the Mess in the Microwave
There is no greater compliment to your cleaning skills than someone commenting that your microwave oven is the cleanest they have ever seen. You’ve never heard someone say that about the microwave in your kitchen? Then let’s get to work! Microwaves are known to be messy. After all, they are designed to warm up food, and usually, that involves spills, spatters, and for some food items, explosions. Who hasn’t put something in the microwave to heat it up only to hear that dreaded POP as it expanded and flung remnants all over the inside of the oven? Some of you may be diligent with covering up food you are warming, but most of us… just hope for the best. And when that fails us, here are a few practical tips to a perfectly clean microwave oven. Start smart The first step to cleaning a dirty microwave oven is to wipe up as much excess food particles you can. Spraying them just means a smeary mess. Use a dish cloth or paper towels to remove food particles, paying special attention to the inside of the door and corners, where particles can build up over time. Steam it up Nothing works better than a little preparation. Take an uncovered bowl of water and put it in the microwave and cook it for two or three minutes. The steam and heat of the water will help loosen the grease and remaining food particles for easier removal. This head start is a very smart way to clean your microwave oven. Wipe it all down It’s best not to spray the interior with just any cleaning solution. What you smell might end up in your food. Residues and odors can affect the next dish you prepare. Instead, use a cloth, hot water, and dish detergent as your cleaning arsenal. With the dampened cloth, wipe away greasy residues and food particles, repeating often until you have a squeaky-clean surface. You can also put the dampened cloth on really stubborn areas and allow the detergent to work a few minutes and then wipe it away. When you are done, dry it all with fresh towels and inspect, recleaning any areas of concern. Of course, to really get something clean in your home, do the right thing. Call your favorite cleaning company. After all, it pays to call a pro! The Often-Forgotten Vacuum Bag
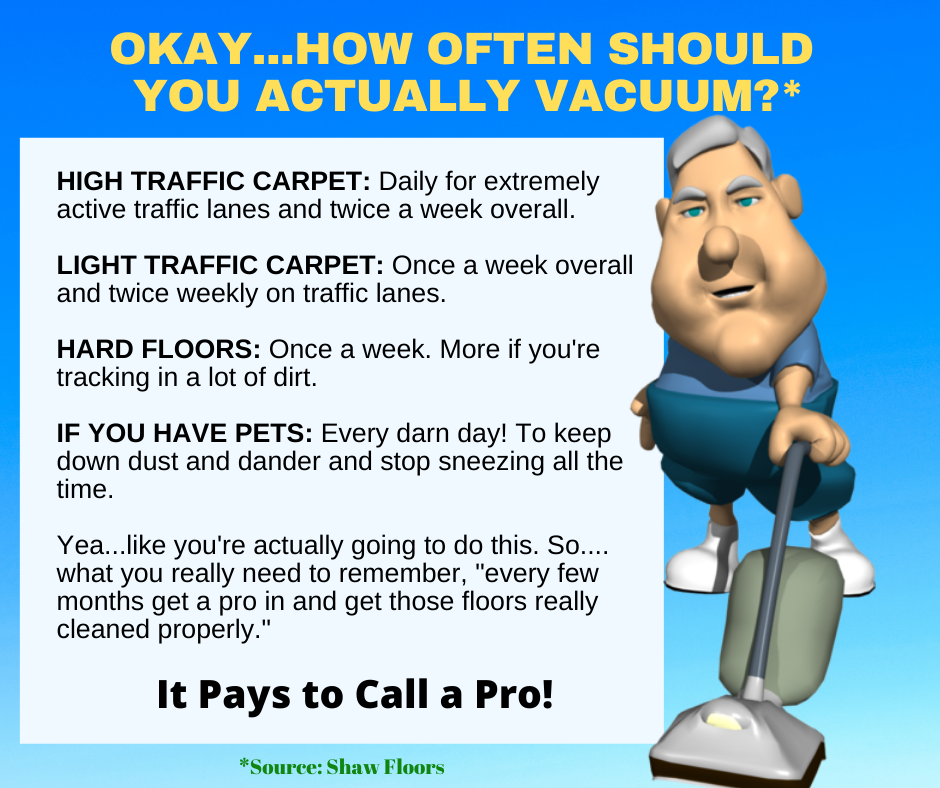
Vacuum cleaners are an integral part of life for any family and a common tool used daily in commercial buildings. While the vacuum hums along doing its job, picking up dirt, grit, debris, and potential contaminants, there is a part of the vacuum we might not think about that often. You usually can’t see it… but it’s right there, inside your vacuum cleaner — the bag. The vacuum bag is the repository of all substances that the vacuum collects through the beater bar or suction assembly and hoses. Unless you use a bagless vacuum, and there are some on the market today, all air goes from the surface being vacuumed and through the vacuum bag. The air you breathe around a vacuum is partly the air that has passed through the unit. Problem detected You know you have a problem when you turn on the vacuum cleaner and notice a foul odor. What you are detecting is the result of organic and inorganic matter inside the vacuum bag that has had time grow microorganisms that create odors. A vacuum bag that has sat a long period of time without being changed or cleaned can produce significant bad odors. While your vacuum cleaner manufacturer will have recommendations on the frequency of changing the bag, those are simply general recommendations. Professional carpet cleaners recommend changing a bag when one-half to two-thirds full. Is that enough? The nose knows In addition to following a schedule, use some common sense. Remember that a vacuum bag in the dark that is stuffed with organic soils will quickly become an odor-causing source. If you vacuum every day, you may not notice it. But give it a week or two, and the odors become evident. At the first hint of an odor, change the bag. Even if you vacuum once or twice, and put the vacuum away for several days, it may be good to change the bag before using it again. Bags are cheap. Your health is not. Professionals cleaners often change the vacuum bag and clean all equipment before going from one home to the next. The do this to avoid cross-contamination. Their basic principles of equipment maintenance keep you and your family safe. When it comes to the absolute best cleaning of all surfaces, do the right thing. Call your favorite cleaning company. After all, it pays to call a pro! A Litter Help
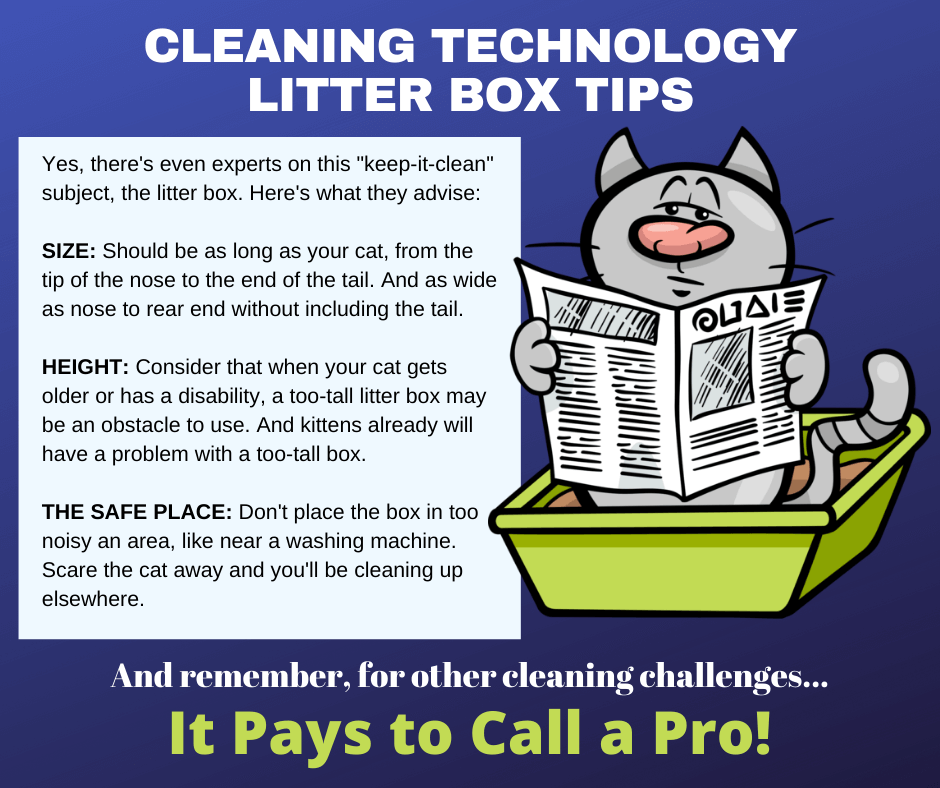
Cats are responsible for many things, such as making you happy when they snuggle up to you, making you cheer when they rid your house of a mouse, and giving you something to do with the camera app on your smartphone. They do a lot to bring people happiness, but they also need quite a bit of attention at the same time. Besides feeding them, taking them to the occasional veterinarian visit, clipping their claws, and generally making them happy, you have something unpleasant to deal with: The litter box. Unless you have a fancy one that is self-cleaning, you have to do the scooping because your cat isn’t going to do it for you. And more than just scooping is involved with the chore. Here are a few tips to give you a “litter help” with the cat box (pun intended). The first thing to consider is a schedule. Don’t just clean the litter box when you smell it or the cat(s) start kicking out some gross objects. It’s good to do it every day, or every two days, so it stays hygienic and doesn’t start to smell. Make it a habit, the frequency of cleaning. Wear rubber gloves and use a scooper meant for the task and scoop out the waste into a plastic bag. DO NOT toss it all in the toilet, as that will just plug up the plumbing and then you have another task to handle. Close the bag up and discard it into the trash can, preferably one outside. Just adding the clumps to your regular trash can in the kitchen means you will have an odiferous situation on your hands within an hour or so. Bag it, close it, toss it. Depending on how many cats you have, completely change out the litter on a schedule as well. This should be done every 3-4 weeks. Completely empty out the pan, and carefully rinse it out, using detergent and hot water, but be careful not to make bigger mess. Remember that most cat litter clumps when wet. Finally, placement of the litter box is important. It needs to be in an area not too close to the nose, if you know what we mean. The litter will come out, either kicked by the cat(s) or tracked out on paws. Sweeping it up is part of the job. And once in a while, your cat(s) cause “accidents” and bad odors can become part of your carpet, furniture, and other textiles. When that happens, do the right thing, and call your favorite cleaning company. After all, it pays to call a pro! |
|

 RSS Feed
|
|
Would you like to get your own OutPost Site? Cleaning and restoration firms who are MarketingZoo.com members get
|
CleaningOutpost.com Directory of Cleaning & Restoration Businesses is a service offered by MarketingZoo.com
Copyright 2015 Thinkshortcut Publishing, LLC
Copyright 2015 Thinkshortcut Publishing, LLC