|
Beware of Dirty Carpet!
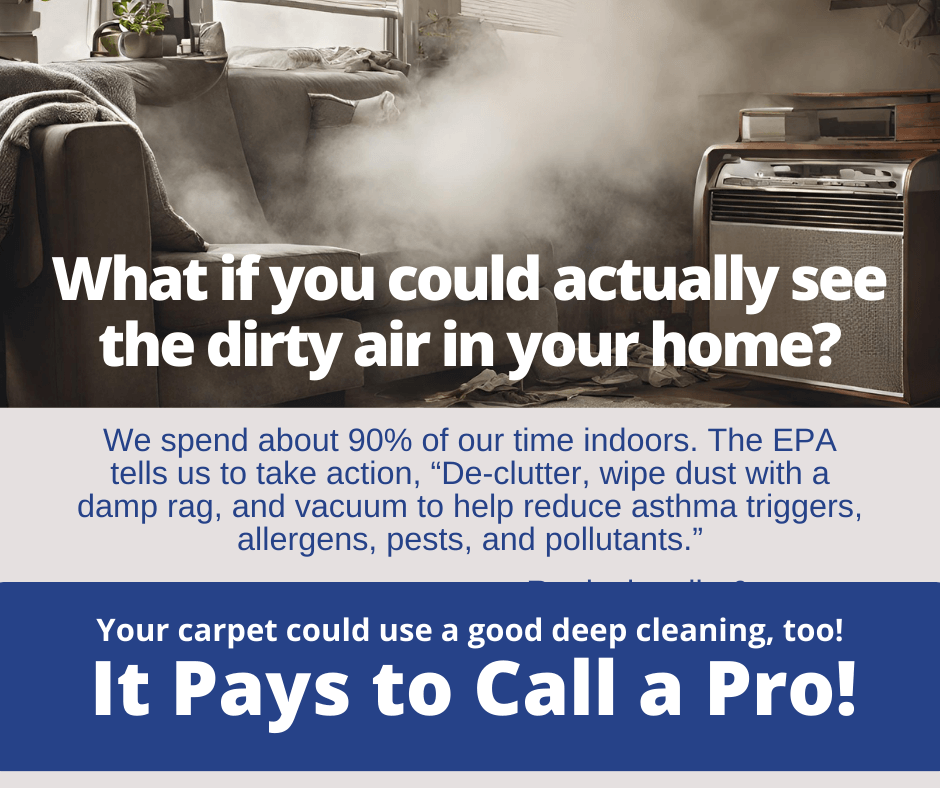
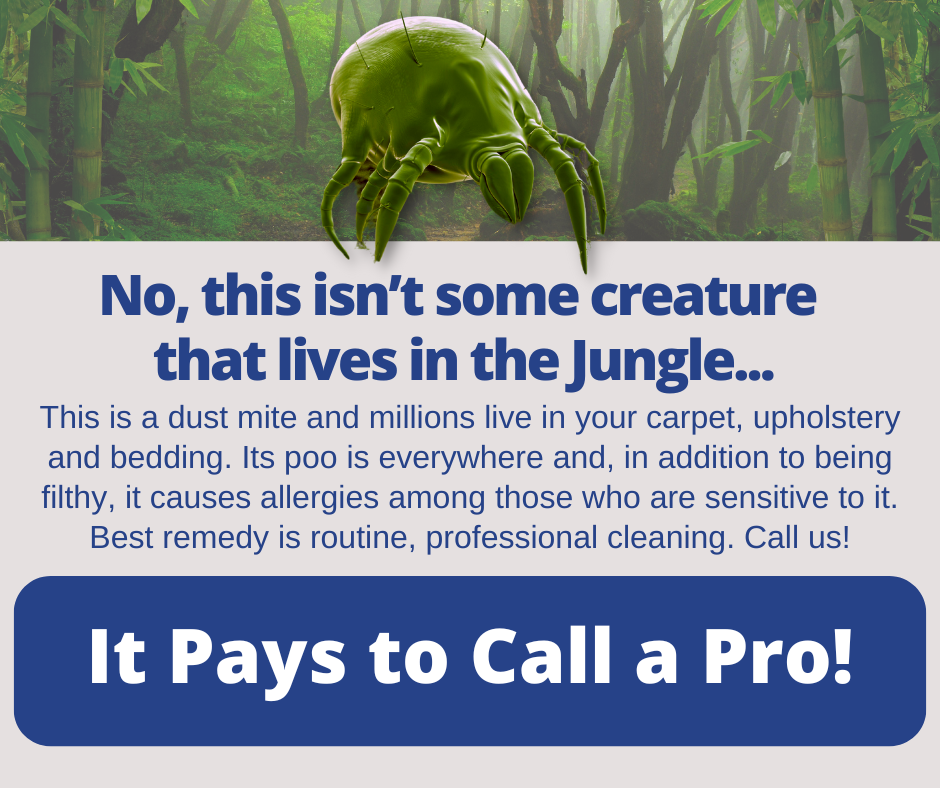
A clean floor is a healthy floor. Yet many neglect cleaning one of the most common surfaces — carpeted floors. There are many reasons to beware of dirty carpet! While “clean” has primarily been directed at surfaces, what is hiding or that lies beneath, such as what can be in your carpet, is potentially harmful. If you have a significant amount of carpet in your home, it’s your biggest filter, and it collects a lot of dust, dander, and allergens. Look at your carpet from several angles. It’s a significant part of your home décor, it’s comfortable, it’s acoustical, among other great qualities. But it is also a reservoir for soil. Carpets may trap allergens like pollen, house dust mites, mold, animal dander, and microscopic parts of insects. These may cause allergic symptoms such as sneezing, red and itchy eyes, a runny nose, or breathing discomfort. This can become a serious health issue, especially for people with developing or advanced respiratory conditions. The situation is sometimes aggravated when improper vacuuming loosens particles into the air, which may cause instant allergic reactions. Dirty carpet carries harmful bacteria from a variety of sources. And this can be more threatening for children and pets because they are in contact with carpet for an extended period. Moreover, spills or pet urine, in particular, foster mold growth, expanding the potential health hazards through gut health and possibly acting as a repository for potential toxins. This can lead to microbial activity, causing carpet fiber damage, and can impact overall immunity in those you love. High microbial contamination in an environment like a dirty carpet causes the body's immune system to work more to fend off possible infections. Skin contact with dirty carpet can also cause irritations and infections like athlete's foot or worsen preexisting skin problems, such as eczema. It is essential to recognize potential issues and do the right thing: Keep your carpet clean. It’s just like any other surface. It would be unheard of to go a year without sweeping and mopping your hard floors. Imagine a bathroom floor going weeks or months… you get the picture. Why allow the carpet to go that long between cleanings? While you should beware of dirty carpet, you should embrace clean carpet. Do the right thing right now. Call your favorite cleaning company and book your cleaning appointment. While you are at it, book some furniture cleaning, too. After all, it pays to call a pro! Determined to Degrease
Have you seen yellow spots on the edges of your toaster, oven hood, or grills? You might wonder how it got there in the first place? Contrary to what you might think, these marks don't result from burning or heat—they're likely congealed cooking grease. But how do you tackle grease solidified on appliance surfaces, seemingly impervious to traditional cleaning methods? Here's how to banish stubborn yellow grease from your kitchen appliances. While a selection of degreasing products is available, you can also whip up effective solutions using items you already have at home. However, before using any product—store-bought or homemade—ensure compatibility with the surface of the appliance you are to clean. To avoid adverse reactions, test the solution on a small, inconspicuous area first. Mix half a cup of dish soap, three tablespoons of ammonia, and half a gallon of warm water to create your degreaser. Apply this mixture generously to the appliance, using an absorbent cloth (do not soak electronic appliances, obviously, and make sure whatever you work on is unplugged), allowing it to soak for a few minutes, depending on the amount of the soil. Afterward, carefully scrub the area with a pad or brush, avoiding abrasive or metal scrubbers to prevent surface scratches. Finally, rinse the area with soap and water, then dry with a paper towel. Another effective solution is WD-40. Apply it to the affected area and scrub the grease using a pad or brush. Then, wash the grease and WD-40 off with soap and warm water for a sparkling clean finish. Of course, the best defense against stubborn grease buildup is prevention. Make it a habit to wipe down your appliances regularly, especially after cooking sessions that generate a lot of grease. Simply using soap and warm water to wipe down kitchen surfaces can save you from facing future tough scrubbing battles. By incorporating these cleaning methods into your routine and staying proactive about maintenance, you can keep your kitchen appliances free from unsightly grease buildup and ensure they remain sparkling clean for years. Cleaning your home is often challenging to do and time-consuming for most. There’s an easier way, especially for special projects such as carpet and furniture cleaning, tile and grout cleaning, window washing, and more. Call your favorite cleaning company. After all, it pays to call a pro! How to Load a Dishwasher
You open the dishwasher, pull out a rack, and drop a dish into a slot. You keep doing that until there is no more room and push “start.” Is that the best way to load a dishwasher? Loading a dishwasher may seem like a simple task, but doing it right means sparkling clean dishes, and doing it wrong means scraping the crud your dishwasher missed and then just redoing a load. There are a few easy, expert tips you can implement to get the most from your faithful dishwasher. Pre-Rinse You don’t need to do this with a modern dishwasher. They are designed to remove food residues, and they do it well. While you should scrape large food particles from your dishes, put them in the dishwasher dirty. Give your dishwasher a chance. Dish Placement If you want hot water to spray easily on all surfaces, put large items on the bottom rack, as the directions should say. Face them inward toward the spray jets, but leave room for water to spray up and past those, reaching other dishes. Your dishwasher may have more than one spray arm, but it doesn’t hurt to leave gaps between dishes so more water flows throughout the interior. The Top The top rack, that is. All your smaller items go here, including cups and glasses. Place everything so dishes won’t tip over. If you have plastic dishes to wash and are concerned about the high heat and possible warping, those should go right at the top. If you are really concerned, you know what to do: Wash by hand. Utensils Your dishwasher has a special place for utensils, and you might think, “I’ll just put them all in there, and all good.” That might work, but some utensils, such as forks and spoons, can stick together, limiting cleaning. Put some upright, some upside down, and leave room for water circulation. The Right Stuff When choosing a detergent for your dishwasher, do your research. Look at the reviews. If your dishwasher has a prewash option, use it. It’s there for a reason. While you may do your dishes, you should leave some cleaning for the professionals, such as your carpet, furniture, and hard floors. Those are tougher than dishes. After all, it pays to call a pro! The Dirty Sponge
We all need towels, rags, or sponges to clean hard surfaces in our homes. The ubiquitous sponge is a very common one found in virtually all kitchens and most bathrooms. They are used to clean everything, from dishes to countertops to stovetops and more. And while we tend to toss paper towels into the garbage can, or wash cotton or other cloths when we do the laundry, at times the sponge can be used and reused and weeks—even months—can go by without cleaning the sponge itself. How can you clean and reuse sponges? According to the United States Department of Agriculture (USDA), your microwave or dishwasher is one of the best ways to clean them and kill bacteria simultaneously. They can eliminate nearly 100 percent of bacteria, helping you to maintain proper hygiene practices. For cleaning and disinfecting sponges in the microwave, thoroughly wet the sponge before putting it inside. Do not microwave a dry sponge, that’s a fire hazard. Microwave the wet sponge on high for just one minute. That zaps the bacteria. Take it out, thoroughly wash it with soap and water, and wring it out and you now have a fresh, clean, healthy sponge to use again. Your dishwasher is effective as well, but not as quick. When you wash your dishes, put it on the top rack and let the dishwasher do all the work. It’s pretty simple. Having the drying option activated means it gets that high heat, which will kill bacteria. But there comes a time when you need to make a hard decision. Yes, that sponge has been faithful, but a kind but firm farewell is warranted after so many uses. The USDA recommends replacing sponges every two weeks to minimize the risk of bacteria buildup and even more often if they get a funky odor. Most do not follow this recommendation, but it's an option if your budget for sponges is healthy. Other maintenance tips include wringing them out in hot water after every use and allowing them to dry completely by putting them in a spot that provides fresh air and even sunshine, which is often possible in a kitchen. Keeping your home nice and clean and healthy is important, and besides doing some of the tasks yourself, there is a better way. Call your favorite cleaning company today, especially for those tough project jobs such as tile and grout cleaning, carpet cleaning, and furniture care. After all, it pays to call a pro! Create a No-Pet-Hair Furniture Zone
As pet owners, we love our furry creatures and the company and comfort they bring to us. But with that is one challenge we often face: Dealing with pet hair on our furniture. If you're tired of constantly battling pet hair on your sofa, loveseat, chairs, or anything that is made of cloth, here are some effective strategies to keep your furniture looking clean and pet-hair-free. Vacuum for the Deepest Clean The most basic and efficient method to removing pet hair from your furniture is by thorough, detailed vacuuming. Regular vacuuming using an upholstery brush attachment can remove loose pet hair and also embedded dander, which is what causes allergic reactions. If you don't have the proper attachment, consider investing in a universal attachment set with an upholstery brush and a crevice tool for those hard-to-reach areas. There are many small, hand-held devices that are perfect for this. Use Hair Removal Tools Turn to handy tools like sticky rollers and furniture brushes between vacuuming sessions. Oversized sticky rollers or those with extendable handles are particularly effective on upholstered furniture, covering more surface area with each pass. Common Household Items You don't always need specialty tools to combat pet hair. Everyday household items can be just as effective. A straightforward method is to put on a rubber glove, dampen it, and run your hand over the sofa's surface, causing the hair to ball up for easy pickup and disposal. Groom Your Pets Prevention is a great way to keep your furniture pet hair-free. Regularly groom your pet with guidance from your vet or groomer to reduce shedding and maintain a healthy coat. Grooming gloves, which help reduce shedding and straighten hair follicles, can effectively remove pet hair from your couch. Now what? Vacuuming, hair removal tools, everyday household items, textile preparation, and regular grooming of your furry companion can make all the difference in keeping your furniture fresh and comfortable for you and your pets. But there’s more! Don’t forget that removing pet hair is just part of maintaining your furniture. Having your furniture professionally cleaned on a regular basis is recommended. Do the right thing and call your favorite cleaning company now for an appointment. After all, it pays to call a pro! Cleaning Up After the Holidays
Cleaning up after the holidays (or any party) can be challenging, especially when dealing with decorations, leftovers, and the general aftermath of festivities. Here are five good cleaning tips to help you tackle the post-holiday mess effectively: 1. Declutter First: Start by decluttering your home. Begin with the holiday decorations, taking them down and packing them away carefully. Dispose of any broken or worn-out decorations. Also, go through gifts, wrapping paper, and packaging materials to recycle or properly store them. Clearing out the clutter will make the cleaning process more manageable. 2. Deep Clean Your Kitchen: The kitchen is often the heart of holiday gatherings and can accumulate dirt and grime. Focus on cleaning your appliances, countertops, and sink thoroughly. Remember to clean the oven and microwave if you've done a lot of cooking. Wipe down the cabinets and mop the floors. Dispose of any leftover food items that have gone bad, and then organize your pantry and fridge. 3. Tackle Stains and Spills: Holiday celebrations can lead to spills and stains on carpets, upholstery, and tablecloths. Act quickly to clean up any spills, using appropriate stain removers or gentle cleaning solutions for delicate fabrics. Steam clean carpets and rugs if necessary. Launder and spot-treat table linens and cloth napkins to remove food or drink stains. 4. Bathroom Cleanup: Bathrooms can be used often during holiday gatherings. Disinfect and clean the toilet, sink, and bathtub or shower. Replace any used or empty toiletries like hand soap and toilet paper rolls. Wash and replace guest towels and empty the bathroom trash cans. 5. Dust and Vacuum: Dust and vacuum your entire home after the decorations are down and the clutter is cleared. Pay special attention to areas that may have accumulated dust during the holiday season, such as shelves, mantels, and corners: vacuum upholstered furniture, curtains, and blinds to remove any lingering dust or pet hair. Bonus Tip: Divide tasks among family members to make the process faster and more efficient. Put those kids to work! Following these cleaning tips, restore your home to its pre-holiday cleanliness and start the new year with a fresh, organized living space. And when you really need some serious help with any cleaning task, such as carpet, upholstery, tile and grout, do the right thing. Call your favorite cleaning company. After all, it pays to call a pro! |
Masters Touch Carpet Care Fresno CA
Archives
June 2024
Fresno CA Cleaning OutPost Site |


 RSS Feed
|
|
Would you like to get your own OutPost Site? Cleaning and restoration firms who are MarketingZoo.com members get
|
CleaningOutpost.com Directory of Cleaning & Restoration Businesses is a service offered by MarketingZoo.com
Copyright 2015 Thinkshortcut Publishing, LLC
Copyright 2015 Thinkshortcut Publishing, LLC