|
Beware of Mold!
Mold is an eyesore, a destroyer of building materials, and a potential health hazard. There are several good reasons to beware of mold! Mold gets started by water intrusion or some moisture issue. Mold is a living substance and needs moisture, air, and a food source to flourish. Left unchecked, mold contamination can go from bad to worse and require significant reconstruction. Identifying and recognizing mold Molds may be manifested in various forms, but molds generally are evidenced by an unpleasantly distinctive smell and discoloration. The most common signs of mold include:
Human health risks Mold exposure can result in several health complications, especially for people with respiratory illnesses, allergies, or immuno-suppressed systems. Most health complications that may arise from molds may include health issues among individuals like allergic responses, attacks to asthmatic conditions, and other respiratory complaints. Long-term exposure may worsen the symptoms and result in several critical health conditions. Mold prevention Mold should be prevented to maintain a healthy home effectively. Here are some strategies to effectively prevent mold:
If you do find mold, clean any visible mold in small areas with water and detergent. However, it is always advisable to hire a professional mold remediation company for larger contaminated areas or if the ventilation system might be infected. Tools and training allow professionals to remove the mold without any risk to you. After all, it pays to call a pro! Beware of Dirty Carpet!
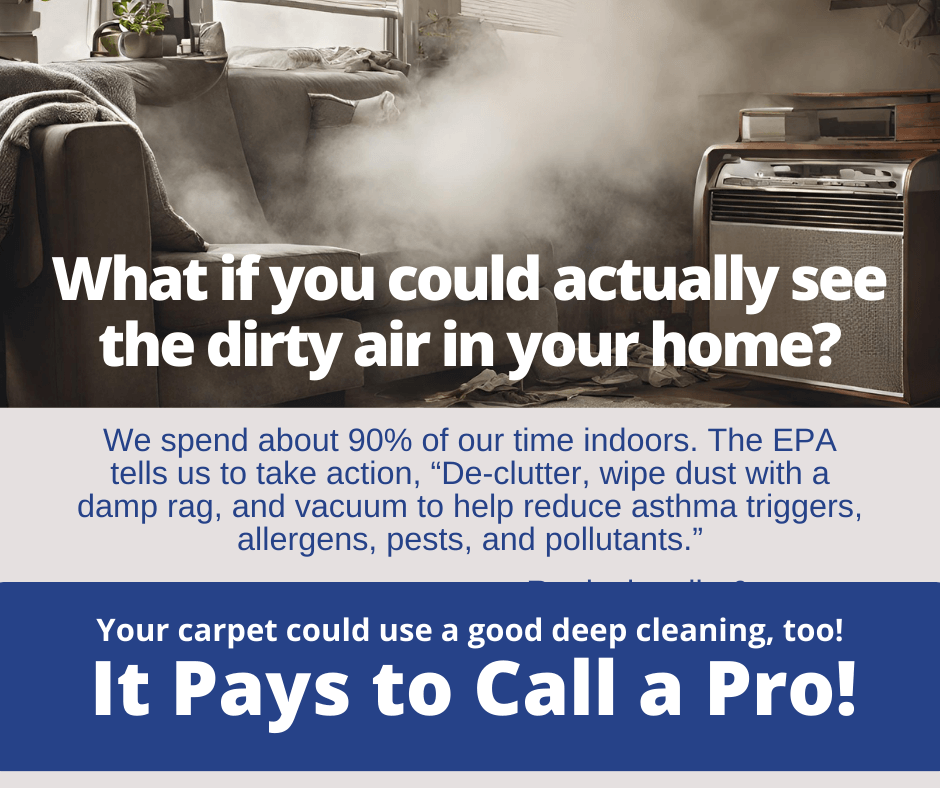
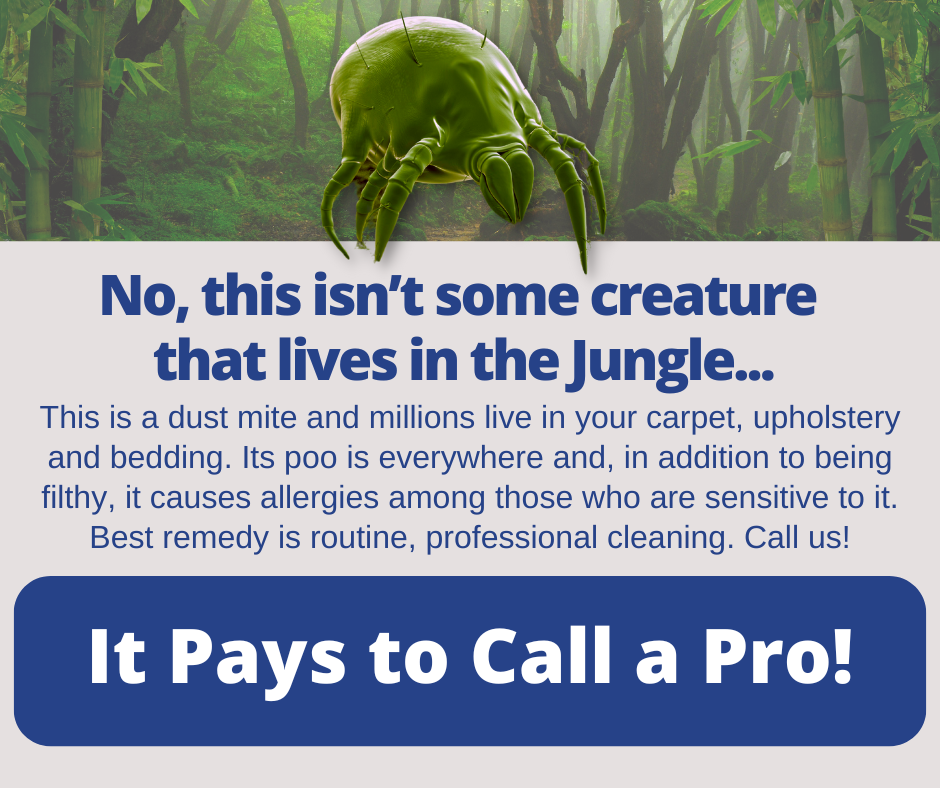
A clean floor is a healthy floor. Yet many neglect cleaning one of the most common surfaces — carpeted floors. There are many reasons to beware of dirty carpet! While “clean” has primarily been directed at surfaces, what is hiding or that lies beneath, such as what can be in your carpet, is potentially harmful. If you have a significant amount of carpet in your home, it’s your biggest filter, and it collects a lot of dust, dander, and allergens. Look at your carpet from several angles. It’s a significant part of your home décor, it’s comfortable, it’s acoustical, among other great qualities. But it is also a reservoir for soil. Carpets may trap allergens like pollen, house dust mites, mold, animal dander, and microscopic parts of insects. These may cause allergic symptoms such as sneezing, red and itchy eyes, a runny nose, or breathing discomfort. This can become a serious health issue, especially for people with developing or advanced respiratory conditions. The situation is sometimes aggravated when improper vacuuming loosens particles into the air, which may cause instant allergic reactions. Dirty carpet carries harmful bacteria from a variety of sources. And this can be more threatening for children and pets because they are in contact with carpet for an extended period. Moreover, spills or pet urine, in particular, foster mold growth, expanding the potential health hazards through gut health and possibly acting as a repository for potential toxins. This can lead to microbial activity, causing carpet fiber damage, and can impact overall immunity in those you love. High microbial contamination in an environment like a dirty carpet causes the body's immune system to work more to fend off possible infections. Skin contact with dirty carpet can also cause irritations and infections like athlete's foot or worsen preexisting skin problems, such as eczema. It is essential to recognize potential issues and do the right thing: Keep your carpet clean. It’s just like any other surface. It would be unheard of to go a year without sweeping and mopping your hard floors. Imagine a bathroom floor going weeks or months… you get the picture. Why allow the carpet to go that long between cleanings? While you should beware of dirty carpet, you should embrace clean carpet. Do the right thing right now. Call your favorite cleaning company and book your cleaning appointment. While you are at it, book some furniture cleaning, too. After all, it pays to call a pro! How Disaster Restoration Pros Work
The devastation to homes and businesses following a disaster—such as a flood, fire, or severe weather event—can be overwhelming. Disaster restoration companies step in, providing the needed services to help individuals and communities recover and rebuild. These specialized firms are equipped to handle the complexities of a disaster’s aftermath, ensuring the quick restoration of affected properties. But have you ever wondered how they operate besides what you see? Rapid response and assessment The first step in the operation of disaster restoration companies is a rapid response. Time is critical when dealing with disaster aftermath, as the extent of damage can quickly go from bad to worse. Restoration companies typically offer 24/7 emergency services, ensuring they can be onsite immediately after being contacted. Upon arrival, the experts conduct an initial assessment to evaluate the damage and formulate a plan of action. Water and fire damage restoration While most disaster restoration companies handle virtually any issue, such as mold remediation, they focus primarily on floods and water-related disasters. They extract water as quickly as possible using specialized equipment. Following water removal, the area is dried using dehumidifiers and air movers to prevent mold and mildew growth, which can pose serious health risks. In the case of fire damage, restoration companies secure the structure, remove debris, and address soot and smoke residue. This process is delicate and complex, as different materials absorb smoke differently and might require specific cleaning agents and techniques to prevent further damage. Reconstruction and final restoration Once the property is cleaned and stabilized, the next phase is reconstruction. This step is important for restoring buildings' structural integrity and restoring them to their pre-loss condition. Additionally, many companies provide content restoration services, restoring furniture, electronics, and personal items affected by the water or fire event. This service can help salvage valuable or sentimental items, reducing the overall impact of the disaster. Continuous communication and support Throughout the entire process, effective communication remains a priority. Restoration companies keep property owners informed, from initial assessments to final walkthroughs. This transparency helps alleviate the stress for those affected and ensures they know the progress. Disaster restoration companies are crucial in helping individuals and communities recover from catastrophic events. When you need their help, they are there for you. After all, it pays to call a pro! Determined to Degrease
Have you seen yellow spots on the edges of your toaster, oven hood, or grills? You might wonder how it got there in the first place? Contrary to what you might think, these marks don't result from burning or heat—they're likely congealed cooking grease. But how do you tackle grease solidified on appliance surfaces, seemingly impervious to traditional cleaning methods? Here's how to banish stubborn yellow grease from your kitchen appliances. While a selection of degreasing products is available, you can also whip up effective solutions using items you already have at home. However, before using any product—store-bought or homemade—ensure compatibility with the surface of the appliance you are to clean. To avoid adverse reactions, test the solution on a small, inconspicuous area first. Mix half a cup of dish soap, three tablespoons of ammonia, and half a gallon of warm water to create your degreaser. Apply this mixture generously to the appliance, using an absorbent cloth (do not soak electronic appliances, obviously, and make sure whatever you work on is unplugged), allowing it to soak for a few minutes, depending on the amount of the soil. Afterward, carefully scrub the area with a pad or brush, avoiding abrasive or metal scrubbers to prevent surface scratches. Finally, rinse the area with soap and water, then dry with a paper towel. Another effective solution is WD-40. Apply it to the affected area and scrub the grease using a pad or brush. Then, wash the grease and WD-40 off with soap and warm water for a sparkling clean finish. Of course, the best defense against stubborn grease buildup is prevention. Make it a habit to wipe down your appliances regularly, especially after cooking sessions that generate a lot of grease. Simply using soap and warm water to wipe down kitchen surfaces can save you from facing future tough scrubbing battles. By incorporating these cleaning methods into your routine and staying proactive about maintenance, you can keep your kitchen appliances free from unsightly grease buildup and ensure they remain sparkling clean for years. Cleaning your home is often challenging to do and time-consuming for most. There’s an easier way, especially for special projects such as carpet and furniture cleaning, tile and grout cleaning, window washing, and more. Call your favorite cleaning company. After all, it pays to call a pro! Determined to Degrease
Have you seen yellow spots on the edges of your toaster, oven hood, or grills? You might wonder how it got there in the first place? Contrary to what you might think, these marks don't result from burning or heat—they're likely congealed cooking grease. But how do you tackle grease solidified on appliance surfaces, seemingly impervious to traditional cleaning methods? Here's how to banish stubborn yellow grease from your kitchen appliances. While a selection of degreasing products is available, you can also whip up effective solutions using items you already have at home. However, before using any product—store-bought or homemade—ensure compatibility with the surface of the appliance you are to clean. To avoid adverse reactions, test the solution on a small, inconspicuous area first. Mix half a cup of dish soap, three tablespoons of ammonia, and half a gallon of warm water to create your degreaser. Apply this mixture generously to the appliance, using an absorbent cloth (do not soak electronic appliances, obviously, and make sure whatever you work on is unplugged), allowing it to soak for a few minutes, depending on the amount of the soil. Afterward, carefully scrub the area with a pad or brush, avoiding abrasive or metal scrubbers to prevent surface scratches. Finally, rinse the area with soap and water, then dry with a paper towel. Another effective solution is WD-40. Apply it to the affected area and scrub the grease using a pad or brush. Then, wash the grease and WD-40 off with soap and warm water for a sparkling clean finish. Of course, the best defense against stubborn grease buildup is prevention. Make it a habit to wipe down your appliances regularly, especially after cooking sessions that generate a lot of grease. Simply using soap and warm water to wipe down kitchen surfaces can save you from facing future tough scrubbing battles. By incorporating these cleaning methods into your routine and staying proactive about maintenance, you can keep your kitchen appliances free from unsightly grease buildup and ensure they remain sparkling clean for years. Cleaning your home is often challenging to do and time-consuming for most. There’s an easier way, especially for special projects such as carpet and furniture cleaning, tile and grout cleaning, window washing, and more. Call your favorite cleaning company. After all, it pays to call a pro! How Evaporation Works
The U.S. EPA says, “Evaporation is the process that changes liquid water to gaseous water (water vapor). Water moves from the Earth’s surface to the atmosphere via evaporation.” Is there more to it? For your home, yes. While there is science to evaporation, and entire industries are dedicated to studying and implementing the science, when things get wet, such as from a failed sump pump, a broken pipe, or water intrusion issues, understanding evaporation and using that knowledge is essential. If you get light water damage, such as something covering a few feet, you will probably attempt to dry it yourself. Whatever you do, make sure you get it completely dry. This is where the science comes in. Evaporation is increased with both air flow and dehumidification. You may have a small dehumidifier, but there is no doubt you have a few fans. By moving air across the wet surface and relying on a dehumidifier to remove the water from the air, you increase evaporation. However, removing water from a surface and not dehumidifying the air means it will take everything longer to dry. When water damage occurs, it’s critical to work on removing the moisture and restoring property right away. This is tough to do without the right equipment, not even considering the time involved. Let the pros do it. If your home has a basement, you probably have moisture. You need to manage that. Opening windows isn’t usually a good option. Installing effective dehumidifiers is one of the best ways to keep a basement dry all the time. You can increase their effectiveness with airflow to move the air around. If your basement walls are constantly wet, it would be smart to have an inspection by an expert who specializes in dry basements. Shop around and look at the reviews. This could get expensive but could also be necessary. Professional contractors use professional tools for almost all water damage or other moisture issues. They have specialized equipment, such as air movers and dehumidifiers, and they have methods to monitor the drying process. These professionals create optimal conditions for evaporation, including controlled temperature, airflow, and humidity levels during the job. So call your favorite restoration company. You don’t want more damage to occur, and you don’t want mold to grow. After all, it pays to call a pro! How to Load a Dishwasher
You open the dishwasher, pull out a rack, and drop a dish into a slot. You keep doing that until there is no more room and push “start.” Is that the best way to load a dishwasher? Loading a dishwasher may seem like a simple task, but doing it right means sparkling clean dishes, and doing it wrong means scraping the crud your dishwasher missed and then just redoing a load. There are a few easy, expert tips you can implement to get the most from your faithful dishwasher. Pre-Rinse You don’t need to do this with a modern dishwasher. They are designed to remove food residues, and they do it well. While you should scrape large food particles from your dishes, put them in the dishwasher dirty. Give your dishwasher a chance. Dish Placement If you want hot water to spray easily on all surfaces, put large items on the bottom rack, as the directions should say. Face them inward toward the spray jets, but leave room for water to spray up and past those, reaching other dishes. Your dishwasher may have more than one spray arm, but it doesn’t hurt to leave gaps between dishes so more water flows throughout the interior. The Top The top rack, that is. All your smaller items go here, including cups and glasses. Place everything so dishes won’t tip over. If you have plastic dishes to wash and are concerned about the high heat and possible warping, those should go right at the top. If you are really concerned, you know what to do: Wash by hand. Utensils Your dishwasher has a special place for utensils, and you might think, “I’ll just put them all in there, and all good.” That might work, but some utensils, such as forks and spoons, can stick together, limiting cleaning. Put some upright, some upside down, and leave room for water circulation. The Right Stuff When choosing a detergent for your dishwasher, do your research. Look at the reviews. If your dishwasher has a prewash option, use it. It’s there for a reason. While you may do your dishes, you should leave some cleaning for the professionals, such as your carpet, furniture, and hard floors. Those are tougher than dishes. After all, it pays to call a pro! |
K-tech Kleening Weston WI
Archives
June 2024
Weston WI Cleaning & Restoration OutPost Site
|


 RSS Feed
|
|
Would you like to get your own OutPost Site? Cleaning and restoration firms who are MarketingZoo.com members get
|
CleaningOutpost.com Directory of Cleaning & Restoration Businesses is a service offered by MarketingZoo.com
Copyright 2015 Thinkshortcut Publishing, LLC
Copyright 2015 Thinkshortcut Publishing, LLC