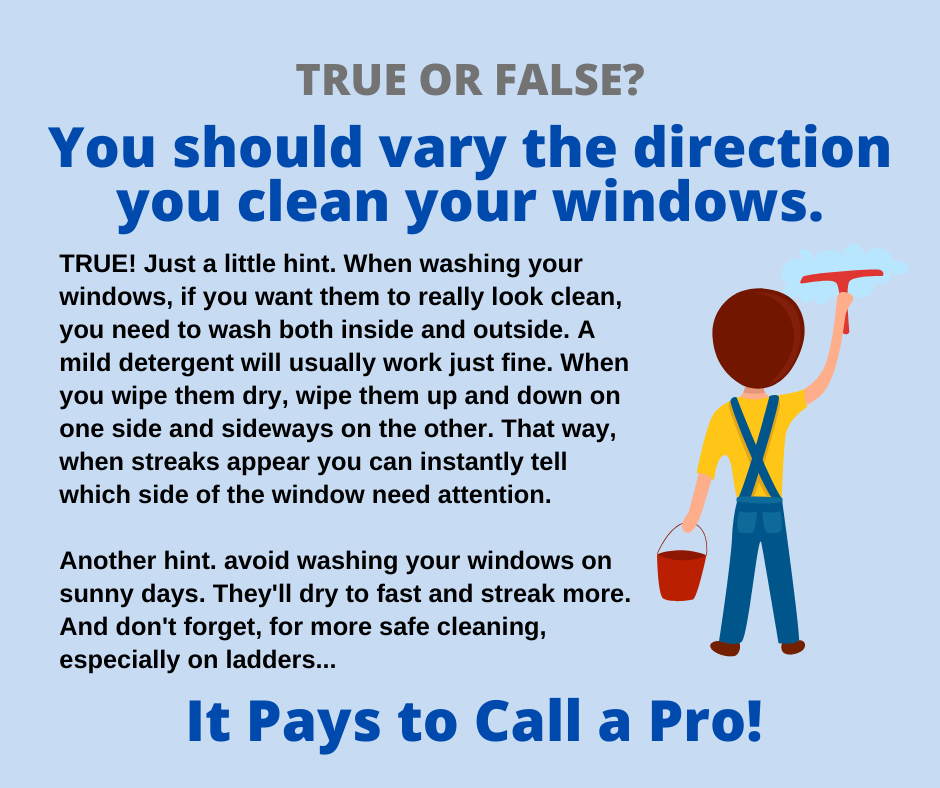
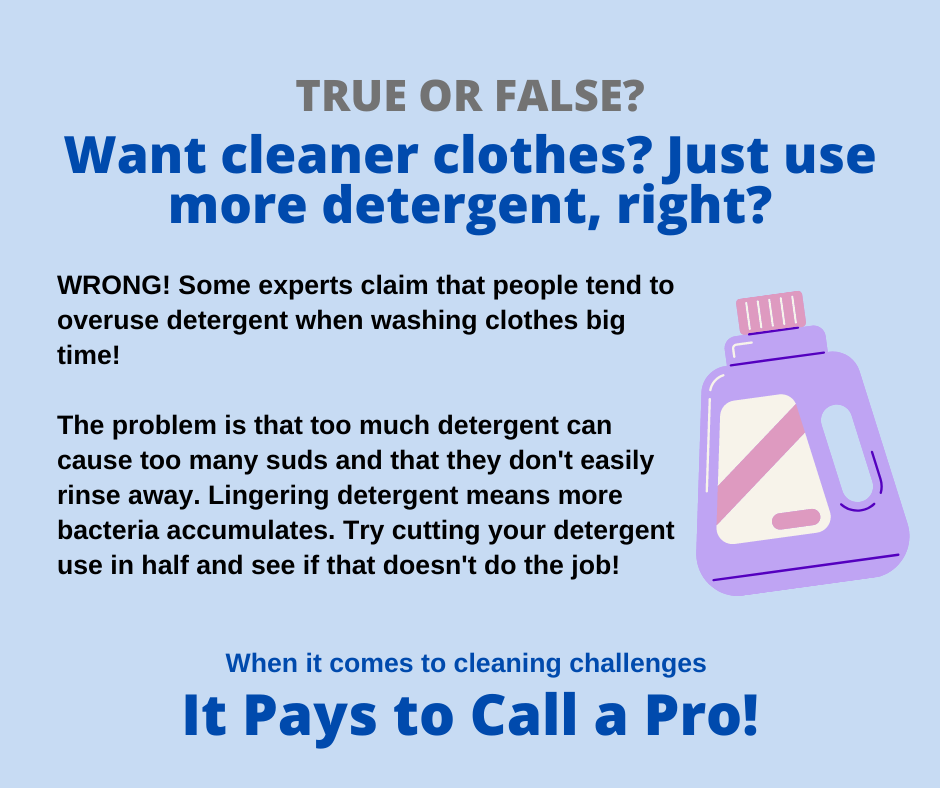
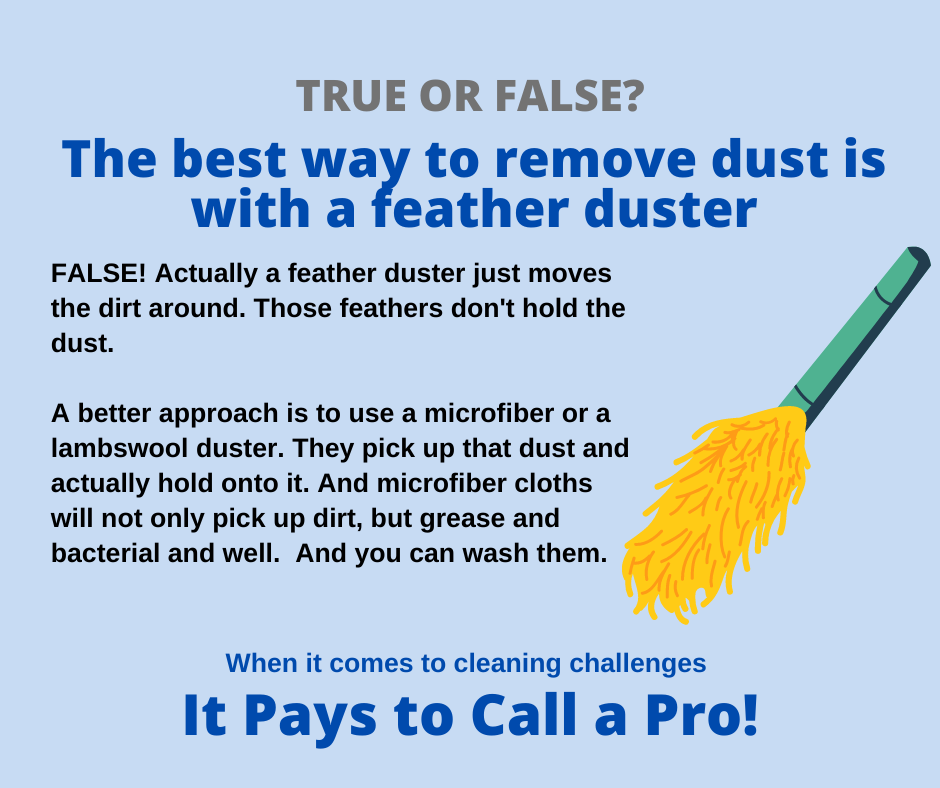
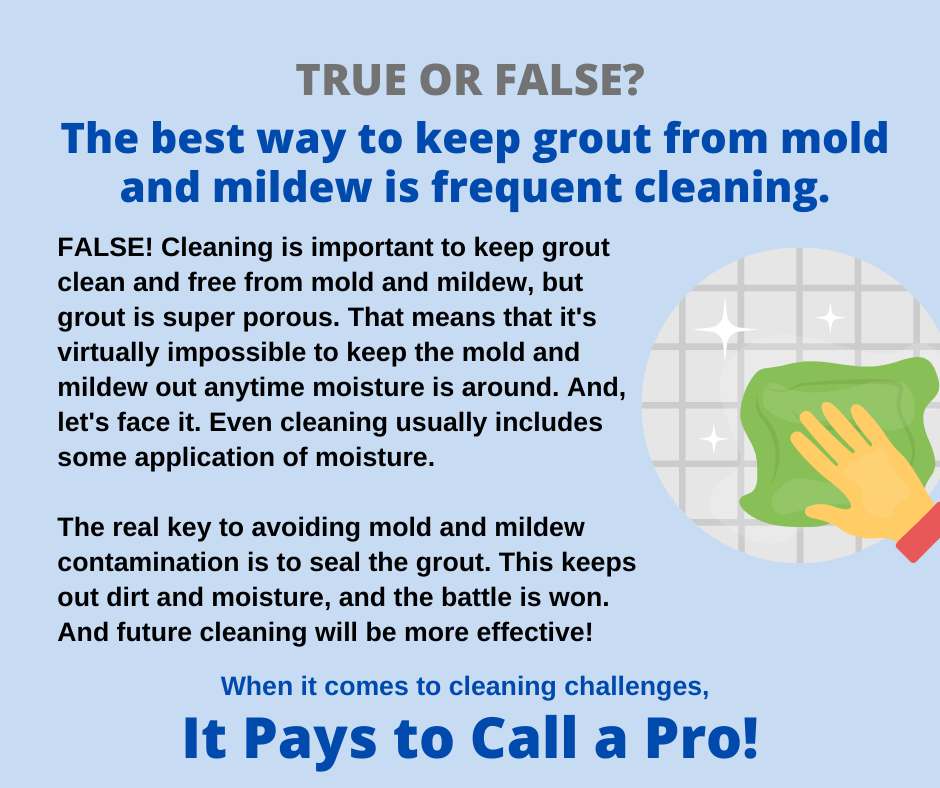
|
Cleaning Up After the Holidays
Cleaning up after the holidays (or any party) can be challenging, especially when dealing with decorations, leftovers, and the general aftermath of festivities. Here are five good cleaning tips to help you tackle the post-holiday mess effectively: 1. Declutter First: Start by decluttering your home. Begin with the holiday decorations, taking them down and packing them away carefully. Dispose of any broken or worn-out decorations. Also, go through gifts, wrapping paper, and packaging materials to recycle or properly store them. Clearing out the clutter will make the cleaning process more manageable. 2. Deep Clean Your Kitchen: The kitchen is often the heart of holiday gatherings and can accumulate dirt and grime. Focus on cleaning your appliances, countertops, and sink thoroughly. Remember to clean the oven and microwave if you've done a lot of cooking. Wipe down the cabinets and mop the floors. Dispose of any leftover food items that have gone bad, and then organize your pantry and fridge. 3. Tackle Stains and Spills: Holiday celebrations can lead to spills and stains on carpets, upholstery, and tablecloths. Act quickly to clean up any spills, using appropriate stain removers or gentle cleaning solutions for delicate fabrics. Steam clean carpets and rugs if necessary. Launder and spot-treat table linens and cloth napkins to remove food or drink stains. 4. Bathroom Cleanup: Bathrooms can be used often during holiday gatherings. Disinfect and clean the toilet, sink, and bathtub or shower. Replace any used or empty toiletries like hand soap and toilet paper rolls. Wash and replace guest towels and empty the bathroom trash cans. 5. Dust and Vacuum: Dust and vacuum your entire home after the decorations are down and the clutter is cleared. Pay special attention to areas that may have accumulated dust during the holiday season, such as shelves, mantels, and corners: vacuum upholstered furniture, curtains, and blinds to remove any lingering dust or pet hair. Bonus Tip: Divide tasks among family members to make the process faster and more efficient. Put those kids to work! Following these cleaning tips, restore your home to its pre-holiday cleanliness and start the new year with a fresh, organized living space. And when you really need some serious help with any cleaning task, such as carpet, upholstery, tile and grout, do the right thing. Call your favorite cleaning company. After all, it pays to call a pro! 5 Keep it Clean Tips
Keeping your house clean for an extended period involves a combination of daily routines and smart strategies. A tidy home looks appealing and contributes to a healthier living environment. Here are five practical ways to help your house stay cleaner for longer: 1. Establish a Cleaning Routine: Consistency is critical. Set up a cleaning schedule that aligns with your lifestyle. Daily tasks like making the bed, washing dishes, and wiping down countertops can help prevent clutter and dirt buildup. Weekly and monthly tasks, such as vacuuming, mopping, and dusting, should be integrated into your routine. Sticking to a schedule will prevent messes from accumulating and becoming overwhelming. 2. Declutter Regularly: The less stuff you have, the easier it is to keep your home clean. Go through your belongings periodically and declutter by donating or discarding items you no longer need. Implement a "one in, one out" rule to remove an old one when you acquire new possessions. Reducing clutter means less dust and fewer areas for dirt to hide. 3. Use Doormats and Shoe Racks: Place doormats inside and outside your entrances to trap dirt and debris from shoes before entering your home. Implement a no-shoes-indoors policy or provide a designated shoe area near the door. This will significantly reduce the amount of dirt and grime tracked through your house. 4. Invest in Quality Cleaning Tools: Quality cleaning tools can make a big difference. Invest in a good vacuum cleaner with a HEPA filter to remove dust and allergens effectively. Microfiber cloths and mop heads are excellent for trapping dirt and are easy to clean. Additionally, consider using eco-friendly cleaning products to maintain a healthier home environment. 5. Practice Preventative Measures: Preventing messes in the first place is one of the best ways to maintain a cleaner home. Business covers on furniture to protect against spills and stains. Use coasters for drinks to prevent water rings on tables. Encourage family members and guests to use trays or placemats when eating in common areas. By implementing these small preventative measures, you can reduce the likelihood of dealing with extensive cleaning tasks later. We all know a clean home requires dedication and organization. And when you need specialty cleaning, such as for carpet, upholstery, or other cleaning tasks, call your favorite cleaning company. After all, it pays to call a pro! A Sticky Issue: How to Remove Gum
Despite its refreshing taste and breath-freshening abilities, chewing gum often finds its way onto and into places it doesn’t belong, stubbornly sticking to surfaces and creating a mess. Fortunately, removing gum isn’t terribly tedious if you know the proper methods. Chewing gum is challenging to remove when warm, so hardening it is the first step in any gum removal process. This can be achieved by using ice cubes or freezing the gum-adhered item, making removing it easier without stretching or damaging the underlying surface. Fabric, carpet, and rugs For fabric, carpet, or rugs, apply an ice cube directly to the gum, rubbing it until it hardens. Placing the gum in the freezer is an efficient alternative if it is on a small, portable item like an item of clothing. Consider putting the ice cube in a plastic bag for rugs or carpet to avoid soaking the material with water. Once the gum hardens, gently scrape it off using a blunt knife, like a dinner or putty knife. Though it requires effort, being cautious can help avoid damage to the fibers. Hair Removing gum from hair necessitates a slightly different approach. Instead of hardening the gum, applying cooking oil or another natural lubricant (some use peanut butter) can ease the removal process. Gently work the substance into the gum and surrounding hair before carefully picking or combing out the gum. This method requires caution, especially when working on someone else, as it can be painful. Alternatively, one can use the freezing process to ‘crack’ the gum off, followed by an oil treatment to remove all remnants. Persistence Regardless of the method used, removing gum demands patience and careful handling. Sometimes, it may require combining techniques, especially for more stubborn pieces. However, diligent application of these methods usually results in successful gum removal, leaving the surface unharmed. By approaching this sticky situation with patience and the proper techniques, you can ensure that the unwelcome gum finds its way out without leaving a trace behind. But at times this type of sticky situation is just too much to handle on your own, such as when gum is embedded and hardened into your carpet or expensive area rug. When that happens, you have a resource you can rely on: Your favorite cleaning company. Do the right thing and let them handle this. After all, it pays to call a pro! 7 Ways to Triumph Over Clutter
Decluttering and organizing one's home can be overwhelming, especially when you are overtaken by too many things collected over the years. Stuff piles up! When that happens, and you can’t take it any longer, it’s time to act. Here are a few ways to triumph over clutter. Set clear goals Before you begin, have a clear goal. Why should you get rid of “stuff”? Are you looking to improve appearances or make room for more “stuff”? Having an objective in mind is going to help with this. Plan and prioritize Keep this manageable. Don’t try to do the entire house in one session. Break it down into manageable tasks. One room at a time. Prioritize based on which areas are most in need or which will provide the most satisfaction once organized. The famous four-pile method You have heard it before. Put things in designated piles. But this is the modern era, so use boxes instead. Have four boxes labeled: Keep, Donate, Trash, and Recycle. You know how you value items so putting them in appropriate boxes should be easy. This will help you stay focused. Organize systematically Once you’ve decluttered, keep the momentum going. Use containers to keep it all in the proper place. Use labels. Zone your spaces, maximizing the use of closets, cupboards, and drawers. Everyone should know where stuff is when they need it. Documents Documents and papers are “stuff” as well. Most opt for digitizing these unless there is a legal reason to have a paper copy. Don’t throw away papers unless you are sure you won’t need them. Photographs, scanned copies into your computer, and all kept in the cloud… use digital technology to help save space and keep documents organized. Transforming Your Car
One of the costliest purchases you will ever make includes your vehicle. You agonize over deciding what type of make or model to purchase. And when that day comes, you are pleased with your choice. A shiny new (or gently used) car is something you value. But over time, your car’s appearance can take a beating, inside and out. While running your vehicle through a car wash is a simple way to keep the exterior clean, the interior is another story. Many consumers turn to the pros for detailing work, and it is tough to match the quality a professional detailing company can provide. But you can achieve impressive results if you do it yourself, using a few basic tools and products. To get started (and we will discuss only the interior here) gather the necessary tools and cleaners. This may include glass cleaner, cleaning solutions, cloth towels, paper towels, a quality vacuum with attachments, and other items you may find you need to do the cleaning. Start with decluttering. Go through your car and remove and discard anything you don’t need. You may find empty coffee cups, and a few wrinkled French fries, it’s amazing what can build up over time in a vehicle. Give the entire interior a thorough vacuuming, and spend plenty of time in the nooks and crannies. Get into the crevices of all the upholstery. Then start wiping everything down, using your cleaning solution and towels (cloth or paper). Find a starting point and start working, cleaning all surfaces except the glass. You will do that later. Wash surfaces, dry them, and inspect them. Redo those areas if not to your satisfaction. Use cotton swabs for the tiny areas you can’t reach with a cloth, such as an air vent. Allow your cleaning solution time to dwell on hardened soils, which are usually food-based. Do the interior glass last. Using your glass cleaner, first clean each window, and then re-clean them. The first cleaning removes the heavy soil and residue buildup and the second polishes it all so you don’t have streaks. You need good lighting to do this, so be sure to set that up in advance. Using a soft, lint-free cloth to go over the glass after cleaning often helps remove final smudges. All this being said, your favorite cleaning company would be happy to handle all of this for you, with professional results. Give them a call for a quote today. After all, it pays to call a pro! Emergency Pet Urine Removal Tips
Our furry friends bring you joy, companionship, and unconditional love, but they can also leave behind unwanted surprises in the form of pet urine. Whether you have a new puppy still in the process of house training or an older cat with occasional accidents, dealing with pet urine of any type can be a challenging task. However, with the right strategies and quick action, you can effectively remove pet urine and keep your home fresh and clean. Here are some emergency pet urine removal tips to help you tackle the situation promptly and efficiently. This applies mainly to carpeted surfaces. Prevention is key To minimize “accidents”, establish a consistent routine for your pets, including regular bathroom breaks, training sessions, and providing appropriate litter boxes or areas. Promptly clean up accidents and use positive reinforcement when your pets use the correct area. Act fast! The key to successful pet urine removal is to act quickly. The longer urine sits on surfaces, the more it soaks through the carpet and nto the pad and subfloor and the more difficult it becomes to eliminate resulting odors — and stains. As soon as you discover a pet accident, grab some paper towels or an absorbent cloth and blot the urine to soak up as much liquid as possible. Keep blotting until no more urine is noticeably absorbed. Products to use The safest product to use is warm water. But there are over-the-counter products that sometimes work fine. From enzyme cleaners and deodorizers to products that break down urine components and allow for easier removal, there are plenty of choices at your grocery or department store. But be very careful as many times overuse of these products can cause more damage than good. Be sure to avoid strong products, such as with ammonia. Ammonia is something that may actually attract pets to a spot and cause more issues. Stick to mild solutions. Deep cleaning For carpet and rugs, it's essential to thoroughly clean both the surface and the underlying padding. Blot up as much urine as possible, then call a pro. Although you can clean the area with a rental machine or one you have purchased, it’s not the same as a thorough professional cleaning. At a minimum, contact your favorite cleaning company for advice and the next steps to ensure your home doesn’t start to smell of pet urine. After all, it pays to call a pro! How to Handle ‘Household Hazardous Waste’
Household hazardous waste (or HHW to keep this simple) is a topic that requires our attention and responsible action. The Environmental Protection Agency (EPA) defines HHW as leftover household products that can be potentially dangerous, as they can catch fire, react, or even explode under certain circumstances. Additionally, these products can be corrosive or toxic, posing serious risks to health and the environment. We must handle and dispose of these materials with great care. Common household items such as paints, cleaners, oils, batteries, pesticides, and more can and often contain hazardous ingredients. Therefore, it is essential to exercise caution when dealing with them. Improper disposal of HHW can have severe consequences. Many people unknowingly pour these substances down the drain, on the ground, into storm sewers, or even mix them with regular trash. However, the dangers of such disposal methods may not be immediately apparent. Improperly discarded HHW can contaminate the environment, pollute water sources, and pose a threat to human health. To ensure the safe handling of household hazardous waste, here are some quick tips to keep in mind, courtesy of groups such as the EPA: 1. Follow product labels: Carefully read and adhere to the instructions for use and storage provided on product labels. This will help prevent accidents and mishaps at home. 2. Dispose according to label instructions: Read product labels to determine the proper disposal directions. This will reduce the risk of products exploding, igniting, leaking, mixing with other chemicals, or posing other hazards during transportation to disposal facilities. 3. Use original containers: Never store hazardous products in food containers. Keep them in their original containers and avoid removing labels. Corroding containers require special handling, so it's important to consult your local hazardous materials official or fire department for proper instructions. 4. Avoid mixing HHW: Never mix HHW with other products. Incompatible substances can react, ignite, or explode, rendering the HHW unrecyclable. It's crucial to handle and dispose of them separately. 5. Seek information from local authorities: Check with your local environmental, health, or solid waste agency for more information on HHW management options available in your area. They can provide guidance on year-round collection systems, designated collection days, and drop-off locations for safe disposal and recycling. 6. Handle empty containers with care: Even empty containers of HHW can pose hazards due to residual chemicals. It's important to handle them with caution and ensure they are disposed of properly. And as with any cleaning-related questions or concerns, contact your favorite cleaning company. After all, it pays to call a pro! Preparing Your Grill for Summer
As spring advances and summer looms, it’s essential to take care of some of your appliances that become popular during those lovely warm days, especially as you spend more time outdoors. Many families focus on the barbecue grill during warm months, as outdoor grilling and eating are popular events. You might have neglected caring for your grill during the winter, as many do, and when you open it up in the spring, you might notice caked-on food particles and rust, and maybe you found a few mice in residence as well. It’s essential to take a few minutes to tune up your grill and accessories before you start cooking your first burger, steak, seafood, fish, or vegetable. Use these easy tips to prep for summer. Cleaning Thoroughly scrub and clean the grill grates, burners, and any other removable parts with a grill brush and mild detergent. This will ensure that your grill is free of any debris or buildup that could affect the flavor of your food. If your grates are particularly dirty, you can soak them in warm, soapy water for a few minutes before scrubbing them. Cleaning grill grates are often compared to the absolute worst dishwashing experience you will ever have, but it is necessary to do it right. Gas supply Check the propane tank and hoses for leaks or damage if you have a gas grill. You may need to replace the tank or hoses if worn or damaged. Do not keep using any hoses or tanks that show any type of wear or damage. Ignition Check the ignition system to ensure it works properly. If not, you may need to replace the ignition system or clean the electrodes. These parts often wear out from use and from inclement weather and moisture and have to be replaced from time to time. Seasoning Before using the grill for the first time, season the grates with oil to prevent sticking and ensure a better flavor. After each thorough cleaning, repeat this process. Stocking up Ensure you have enough fuel, charcoal, wood chips, and other supplies for last summer. If using propane, consider a backup tank because, for some weird reason, tanks always go empty right in the middle of cooking. By following these steps, you can ensure that your grill is ready for summer and that you can enjoy delicious barbecues all season long. And as part of summer, make sure your entire home is clean and ready for friends and family. Call your favorite cleaning company to help you with your cleaning tasks. After all, it pays to call a pro! |
Country Road Carpet Cleaning Battle Ground WA
Call: 360-687-6156 Cleaning OutPost Battle Ground WA
January 2024
|

 RSS Feed
|
|
Would you like to get your own OutPost Site? Cleaning and restoration firms who are MarketingZoo.com members get
|
CleaningOutpost.com Directory of Cleaning & Restoration Businesses is a service offered by MarketingZoo.com
Copyright 2015 Thinkshortcut Publishing, LLC
Copyright 2015 Thinkshortcut Publishing, LLC