|
How to Fix the Mess in the Microwave
There is no greater compliment to your cleaning skills than someone commenting that your microwave oven is the cleanest they have ever seen. You’ve never heard someone say that about the microwave in your kitchen? Then let’s get to work! Microwaves are known to be messy. After all, they are designed to warm up food, and usually, that involves spills, spatters, and for some food items, explosions. Who hasn’t put something in the microwave to heat it up only to hear that dreaded POP as it expanded and flung remnants all over the inside of the oven? Some of you may be diligent with covering up food you are warming, but most of us… just hope for the best. And when that fails us, here are a few practical tips to a perfectly clean microwave oven. Start smart The first step to cleaning a dirty microwave oven is to wipe up as much excess food particles you can. Spraying them just means a smeary mess. Use a dish cloth or paper towels to remove food particles, paying special attention to the inside of the door and corners, where particles can build up over time. Steam it up Nothing works better than a little preparation. Take an uncovered bowl of water and put it in the microwave and cook it for two or three minutes. The steam and heat of the water will help loosen the grease and remaining food particles for easier removal. This head start is a very smart way to clean your microwave oven. Wipe it all down It’s best not to spray the interior with just any cleaning solution. What you smell might end up in your food. Residues and odors can affect the next dish you prepare. Instead, use a cloth, hot water, and dish detergent as your cleaning arsenal. With the dampened cloth, wipe away greasy residues and food particles, repeating often until you have a squeaky-clean surface. You can also put the dampened cloth on really stubborn areas and allow the detergent to work a few minutes and then wipe it away. When you are done, dry it all with fresh towels and inspect, recleaning any areas of concern. Of course, to really get something clean in your home, do the right thing. Call your favorite cleaning company. After all, it pays to call a pro! The Often-Forgotten Vacuum Bag
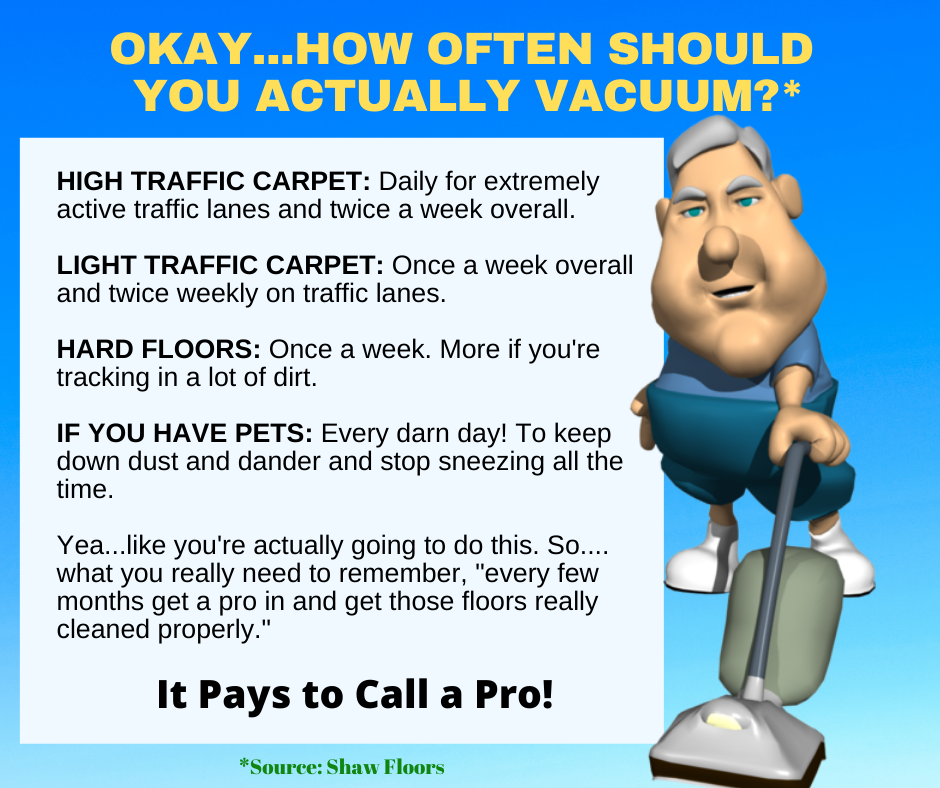
Vacuum cleaners are an integral part of life for any family and a common tool used daily in commercial buildings. While the vacuum hums along doing its job, picking up dirt, grit, debris, and potential contaminants, there is a part of the vacuum we might not think about that often. You usually can’t see it… but it’s right there, inside your vacuum cleaner — the bag. The vacuum bag is the repository of all substances that the vacuum collects through the beater bar or suction assembly and hoses. Unless you use a bagless vacuum, and there are some on the market today, all air goes from the surface being vacuumed and through the vacuum bag. The air you breathe around a vacuum is partly the air that has passed through the unit. Problem detected You know you have a problem when you turn on the vacuum cleaner and notice a foul odor. What you are detecting is the result of organic and inorganic matter inside the vacuum bag that has had time grow microorganisms that create odors. A vacuum bag that has sat a long period of time without being changed or cleaned can produce significant bad odors. While your vacuum cleaner manufacturer will have recommendations on the frequency of changing the bag, those are simply general recommendations. Professional carpet cleaners recommend changing a bag when one-half to two-thirds full. Is that enough? The nose knows In addition to following a schedule, use some common sense. Remember that a vacuum bag in the dark that is stuffed with organic soils will quickly become an odor-causing source. If you vacuum every day, you may not notice it. But give it a week or two, and the odors become evident. At the first hint of an odor, change the bag. Even if you vacuum once or twice, and put the vacuum away for several days, it may be good to change the bag before using it again. Bags are cheap. Your health is not. Professionals cleaners often change the vacuum bag and clean all equipment before going from one home to the next. The do this to avoid cross-contamination. Their basic principles of equipment maintenance keep you and your family safe. When it comes to the absolute best cleaning of all surfaces, do the right thing. Call your favorite cleaning company. After all, it pays to call a pro! Is It Your Decision?
No matter the time of year or the season, flooding can happen to any home or business. When it does, the immediate thought most have is, “Who is going to pay for all of this?” Most then call their insurance company, since events like flooding is why insurance is purchased in the first place. For some reason, many flooding issues occur at night or on the weekend, when your local insurance company is closed, if you have a local agent. You call, leave a message, and wait. And wait. They may never call you, or at best call you when you are solidly in panic mode, and the reason may be because they aren’t the ones to handle your claim in the first place. They sell the insurance. They may not service the insurance claim. Most likely, you need to call a national emergency hotline number. You should always have that on file and ready just in case something happens to your home. When you reach your insurance company, or at least the part of it that makes decisions on paying for the repairs, you may be told to use a specific contractor, a local firm the insurance company has a special relationship with. It may not be the company you want to use. But always remember this: It’s your decision who you use to work on your home. Of course, you may have to fight for your rights. This being said, using the contractor recommended by the insurance company may not be a bad idea. That company may be completely qualified and know exactly what your home needs to get back to pre-flood condition. But no matter what, it’s your decision. Getting references and looking at reviews should always be a priority when hiring a contractor to work on your home. Be sure to document everything, including the time you spend on cleaning up the mess. Take pictures. The more documentation and pictures you have, the better you can negotiate how much of the damage will be covered by your insurance policy. You will have to pay the deductible, but often the time you spend and the resources of your own you use to work on the flood is credited to you. It’s a conversation to have with your insurance company and your contractor. No matter what, though, do the right thing. Call your restoration company immediately when a flood occurs. After all, it pays to call a pro! A Litter Help
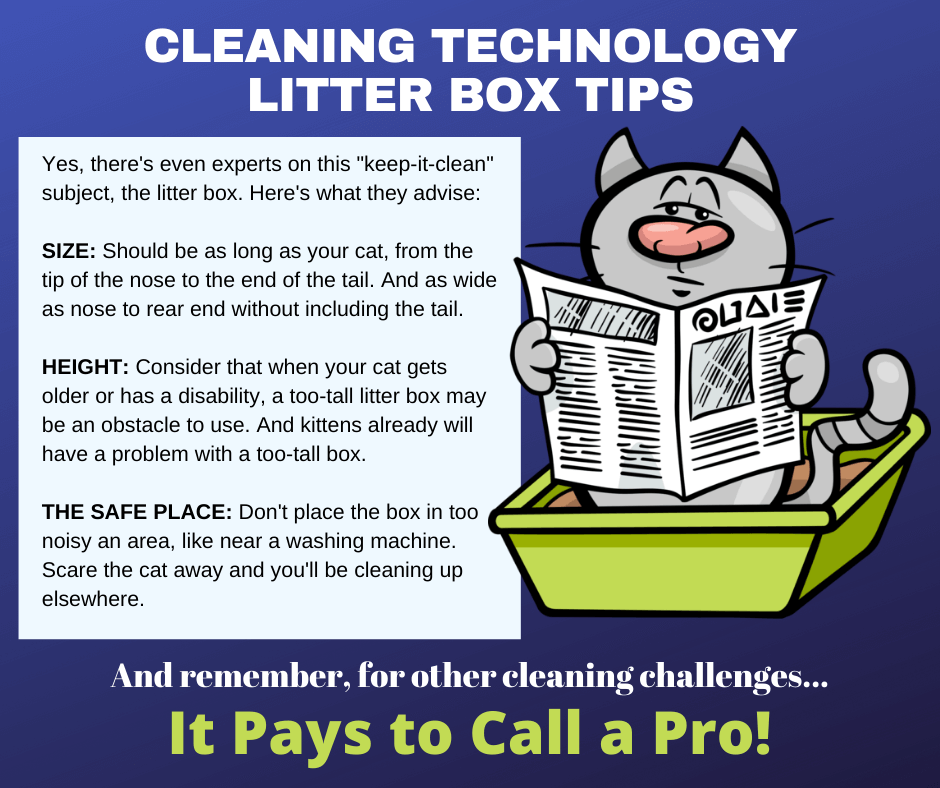
Cats are responsible for many things, such as making you happy when they snuggle up to you, making you cheer when they rid your house of a mouse, and giving you something to do with the camera app on your smartphone. They do a lot to bring people happiness, but they also need quite a bit of attention at the same time. Besides feeding them, taking them to the occasional veterinarian visit, clipping their claws, and generally making them happy, you have something unpleasant to deal with: The litter box. Unless you have a fancy one that is self-cleaning, you have to do the scooping because your cat isn’t going to do it for you. And more than just scooping is involved with the chore. Here are a few tips to give you a “litter help” with the cat box (pun intended). The first thing to consider is a schedule. Don’t just clean the litter box when you smell it or the cat(s) start kicking out some gross objects. It’s good to do it every day, or every two days, so it stays hygienic and doesn’t start to smell. Make it a habit, the frequency of cleaning. Wear rubber gloves and use a scooper meant for the task and scoop out the waste into a plastic bag. DO NOT toss it all in the toilet, as that will just plug up the plumbing and then you have another task to handle. Close the bag up and discard it into the trash can, preferably one outside. Just adding the clumps to your regular trash can in the kitchen means you will have an odiferous situation on your hands within an hour or so. Bag it, close it, toss it. Depending on how many cats you have, completely change out the litter on a schedule as well. This should be done every 3-4 weeks. Completely empty out the pan, and carefully rinse it out, using detergent and hot water, but be careful not to make bigger mess. Remember that most cat litter clumps when wet. Finally, placement of the litter box is important. It needs to be in an area not too close to the nose, if you know what we mean. The litter will come out, either kicked by the cat(s) or tracked out on paws. Sweeping it up is part of the job. And once in a while, your cat(s) cause “accidents” and bad odors can become part of your carpet, furniture, and other textiles. When that happens, do the right thing, and call your favorite cleaning company. After all, it pays to call a pro! Water Intrusion Precautions
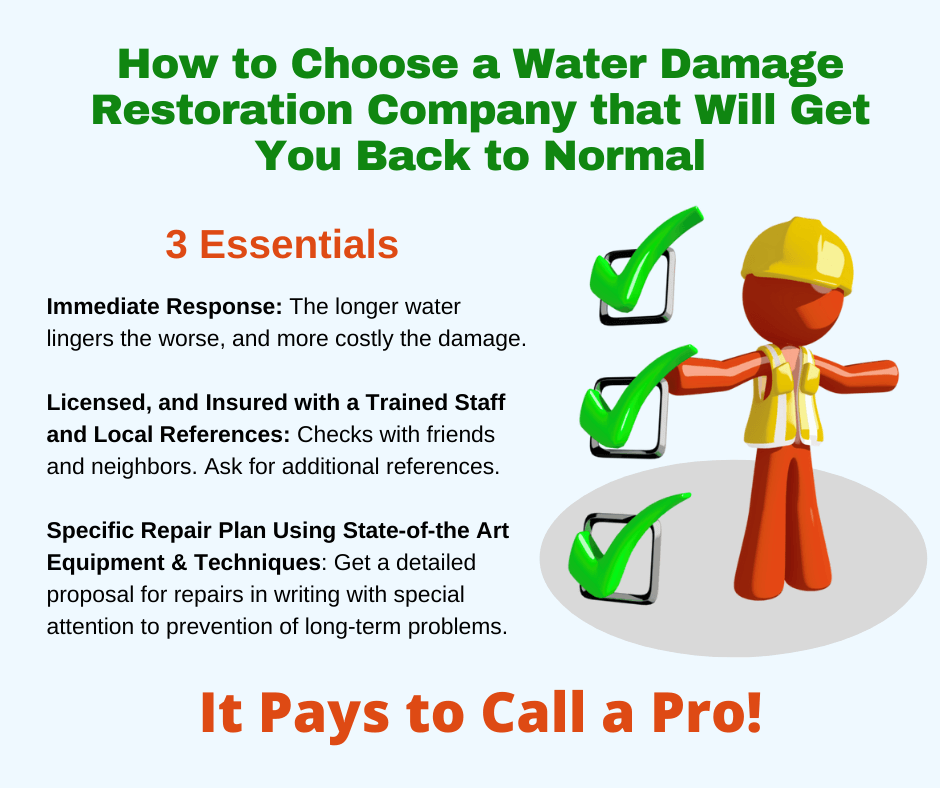
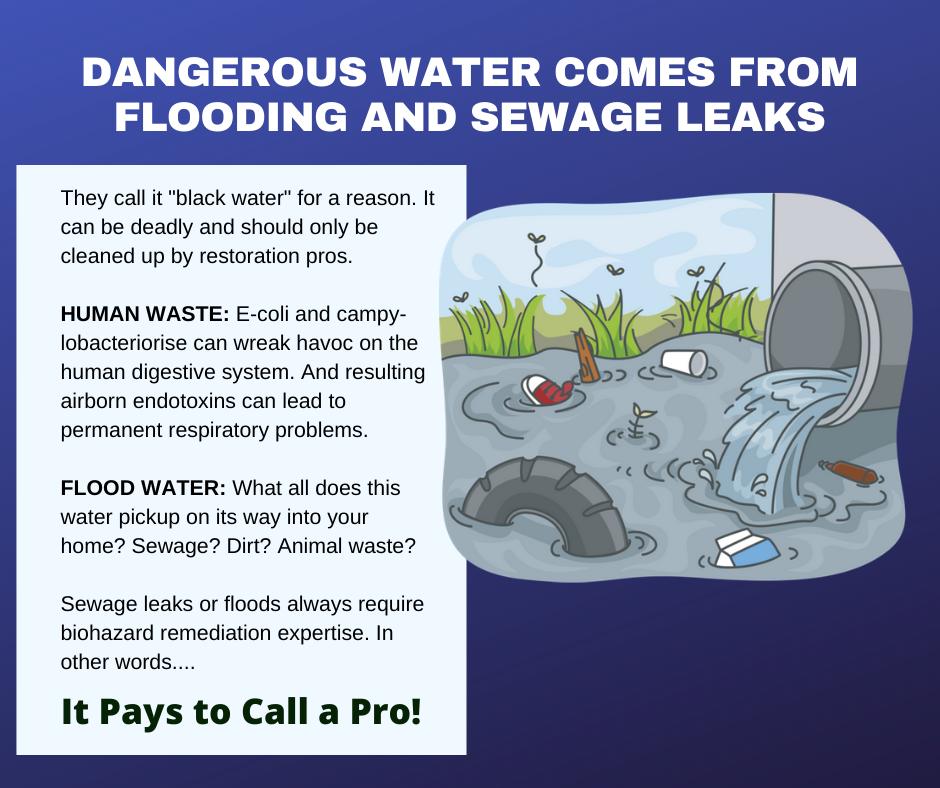
When water finds its way into your home, in the form of a flood, plugged drain that backs up, or a pipe breaking, it takes just seconds for some serious damage to occur. Water intrusion, especially over time, affects all types of building materials. It can quickly leave you with a big mess to clean up, and sometimes the damage is more significant than what you originally thought. Some water intrusions you can handle yourself, such as water on a concrete floor in the basement. Many homeowners have simply pushed that type of water into floor drains or used wet/dry vacuums to suck it up. But if there is significant flooding, or if it has affected building materials, that’s a different story. You want to first think about the type of water that has caused the damage. Types of water It could be “clean” water, such as from rain or leaky pipes, which is a type of water you can sometimes clean up yourself. It could be “gray” water, which might come from a dishwasher, a washing machine, or an overflowing sink, and may require professional cleanup. Or — worst case situation — it could be “black” water, which you should not attempt cleaning because that means it came from a sewer, a flood, or some other situation that could have heavily contamination and health hazards. With most gray and with all black water flooding situations, it’s best to call a disaster restoration company. Safety first But no matter what, be sure to be safe. With any type of flooding, turn off the power to affected areas and unplug electronics and appliances, in that order. Never step into standing water if there is any danger of electricity being on. Nothing is worth a trip to the hospital — or worse. Working in a structure with black water also can be a safety issue — to your health. The reason you should always call a pro with black water is because of the bacteria and contamination that can make you sick, really sick. Cleaning and restoration professionals have the personal protective equipment needed to do the job right and do it safety. We aren’t talking about gloves and goggles, but about complete body protection, respirators, and more. Water damage is a stressful situation, for anyone affected, in any situation. But it can all be fixed. Do the right thing and reach out to your favorite restoration company when anything happens to your home. After all, it pays to call a pro! Computer Cleaning Made Simple
When people discuss “cleaning the computer” they often refer to running a disk check, removing old files, deleting applications that just take up space, and all the tasks that help it to run faster. But cleaning can be an old-fashioned task and add value to that electronic device you rely on each and every day. Everything works better when it is cleaned and maintained. Whether you have a computer with a “tower” and separate monitor, keyboard, etc., or a laptop, or a tablet, even a smartphone, they all need attention from time to time. Keep it safe and organized The first step is to turn off the device, no matter what. Electric shock can occur during cleaning, especially since you will use moisture to some degree. Take apart the tower (if you have one), remove it, and keep all the screws and tiny parts organized. There’s nothing more frustrating than taking something apart and either losing a small part or having extra when the job is done. Getting to work Using compressed air, such as from a small can, blow out the dust that has accumulated inside. There may even be some spider webs. If you need to wipe out the interior, use a very soft cloth and be careful with the wires and connections. You don’t want a cleaning to turn into a repair. Most likely, the computer or device you have is a laptop or tablet. For those, using compressed air is smart on openings and vented areas, you want to keep dust out of the device. A close examination of ports often shows accumulation of soil and grime. With any device, wiping down the outside keeps oils from building up and especially helps with any buttons and keys. Using a solution such as for eyeglasses, and a soft microfiber cloth, apply the solution to surfaces and quickly (before it penetrates) wipe it off. Screens can be stubborn, as they show streaks. Microfiber cloths are the best tool for minimizing streaks. For keyboards, use compressed air and cotton swabs to remove the dust and buildup in crevices. For stubborn soils, a little more effort will be required and maybe some careful cleaning with sharp objects, such as a wooden toothpick, might be warranted. But always be very careful not to cause damage to the keys. And don’t forget, for all your cleaning needs and questions, contact your favorite cleaning company. After all, it pays to call a pro! |

 RSS Feed
|
|
Would you like to get your own OutPost Site? Cleaning and restoration firms who are MarketingZoo.com members get
|
CleaningOutpost.com Directory of Cleaning & Restoration Businesses is a service offered by MarketingZoo.com
Copyright 2015 Thinkshortcut Publishing, LLC
Copyright 2015 Thinkshortcut Publishing, LLC