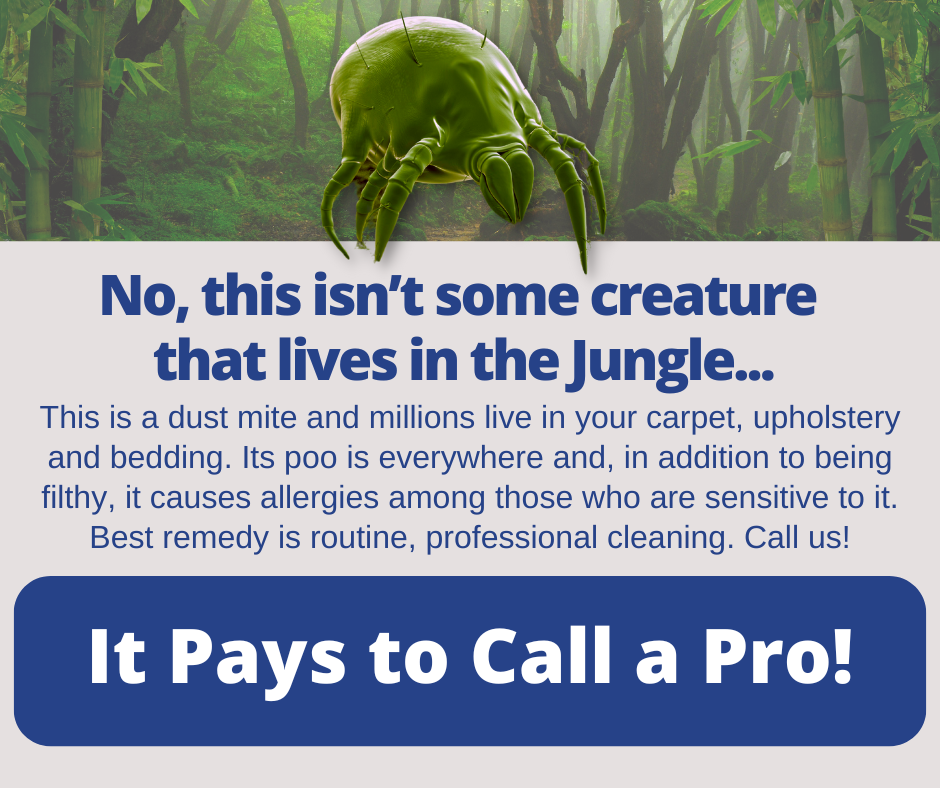
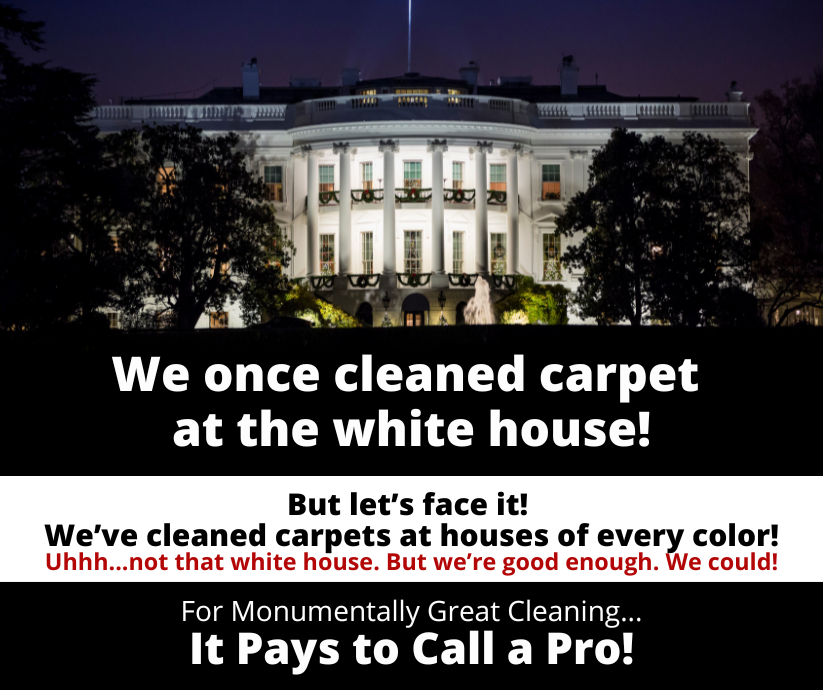
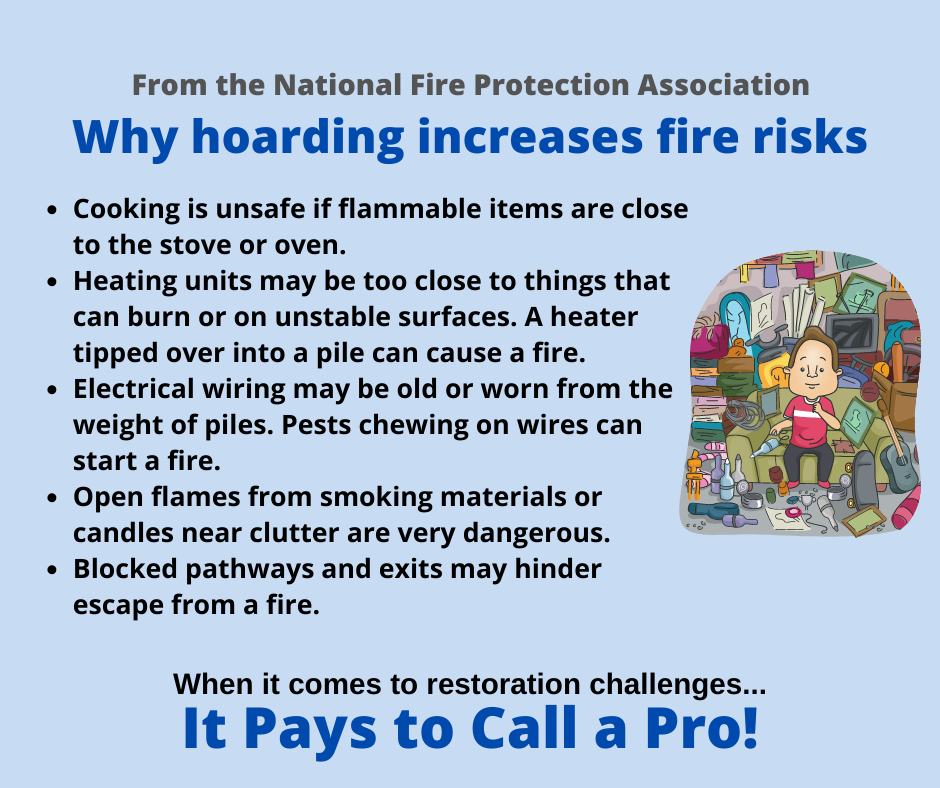
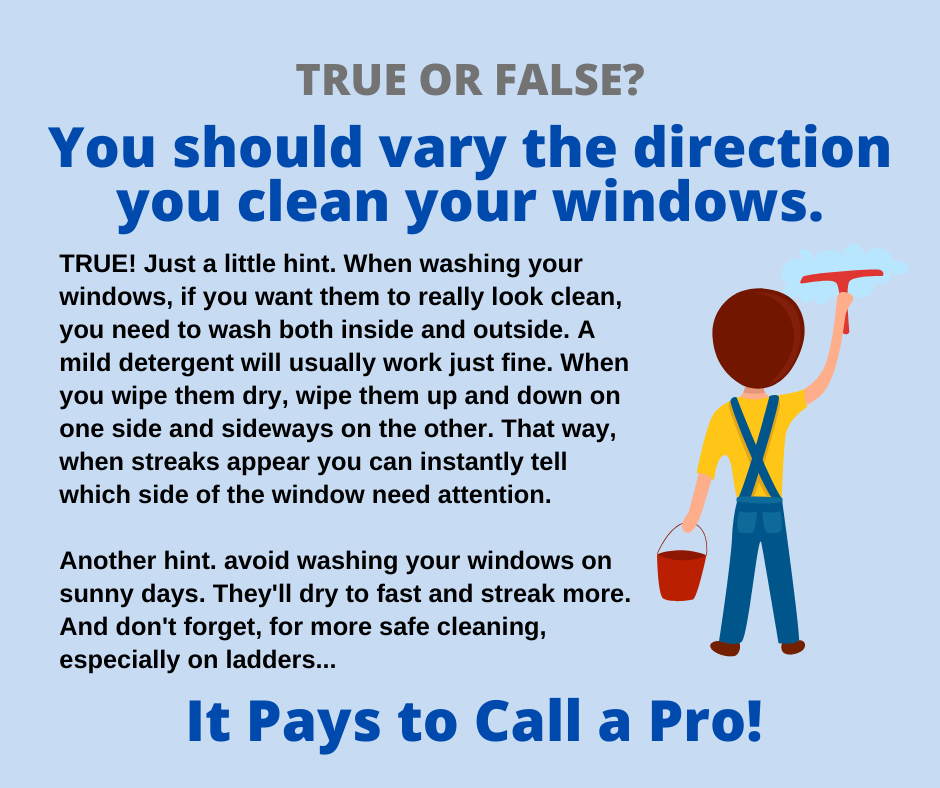
|
How to Load a Dishwasher
You open the dishwasher, pull out a rack, and drop a dish into a slot. You keep doing that until there is no more room and push “start.” Is that the best way to load a dishwasher? Loading a dishwasher may seem like a simple task, but doing it right means sparkling clean dishes, and doing it wrong means scraping the crud your dishwasher missed and then just redoing a load. There are a few easy, expert tips you can implement to get the most from your faithful dishwasher. Pre-Rinse You don’t need to do this with a modern dishwasher. They are designed to remove food residues, and they do it well. While you should scrape large food particles from your dishes, put them in the dishwasher dirty. Give your dishwasher a chance. Dish Placement If you want hot water to spray easily on all surfaces, put large items on the bottom rack, as the directions should say. Face them inward toward the spray jets, but leave room for water to spray up and past those, reaching other dishes. Your dishwasher may have more than one spray arm, but it doesn’t hurt to leave gaps between dishes so more water flows throughout the interior. The Top The top rack, that is. All your smaller items go here, including cups and glasses. Place everything so dishes won’t tip over. If you have plastic dishes to wash and are concerned about the high heat and possible warping, those should go right at the top. If you are really concerned, you know what to do: Wash by hand. Utensils Your dishwasher has a special place for utensils, and you might think, “I’ll just put them all in there, and all good.” That might work, but some utensils, such as forks and spoons, can stick together, limiting cleaning. Put some upright, some upside down, and leave room for water circulation. The Right Stuff When choosing a detergent for your dishwasher, do your research. Look at the reviews. If your dishwasher has a prewash option, use it. It’s there for a reason. While you may do your dishes, you should leave some cleaning for the professionals, such as your carpet, furniture, and hard floors. Those are tougher than dishes. After all, it pays to call a pro! The Dirty Sponge
We all need towels, rags, or sponges to clean hard surfaces in our homes. The ubiquitous sponge is a very common one found in virtually all kitchens and most bathrooms. They are used to clean everything, from dishes to countertops to stovetops and more. And while we tend to toss paper towels into the garbage can, or wash cotton or other cloths when we do the laundry, at times the sponge can be used and reused and weeks—even months—can go by without cleaning the sponge itself. How can you clean and reuse sponges? According to the United States Department of Agriculture (USDA), your microwave or dishwasher is one of the best ways to clean them and kill bacteria simultaneously. They can eliminate nearly 100 percent of bacteria, helping you to maintain proper hygiene practices. For cleaning and disinfecting sponges in the microwave, thoroughly wet the sponge before putting it inside. Do not microwave a dry sponge, that’s a fire hazard. Microwave the wet sponge on high for just one minute. That zaps the bacteria. Take it out, thoroughly wash it with soap and water, and wring it out and you now have a fresh, clean, healthy sponge to use again. Your dishwasher is effective as well, but not as quick. When you wash your dishes, put it on the top rack and let the dishwasher do all the work. It’s pretty simple. Having the drying option activated means it gets that high heat, which will kill bacteria. But there comes a time when you need to make a hard decision. Yes, that sponge has been faithful, but a kind but firm farewell is warranted after so many uses. The USDA recommends replacing sponges every two weeks to minimize the risk of bacteria buildup and even more often if they get a funky odor. Most do not follow this recommendation, but it's an option if your budget for sponges is healthy. Other maintenance tips include wringing them out in hot water after every use and allowing them to dry completely by putting them in a spot that provides fresh air and even sunshine, which is often possible in a kitchen. Keeping your home nice and clean and healthy is important, and besides doing some of the tasks yourself, there is a better way. Call your favorite cleaning company today, especially for those tough project jobs such as tile and grout cleaning, carpet cleaning, and furniture care. After all, it pays to call a pro! Create a No-Pet-Hair Furniture Zone
As pet owners, we love our furry creatures and the company and comfort they bring to us. But with that is one challenge we often face: Dealing with pet hair on our furniture. If you're tired of constantly battling pet hair on your sofa, loveseat, chairs, or anything that is made of cloth, here are some effective strategies to keep your furniture looking clean and pet-hair-free. Vacuum for the Deepest Clean The most basic and efficient method to removing pet hair from your furniture is by thorough, detailed vacuuming. Regular vacuuming using an upholstery brush attachment can remove loose pet hair and also embedded dander, which is what causes allergic reactions. If you don't have the proper attachment, consider investing in a universal attachment set with an upholstery brush and a crevice tool for those hard-to-reach areas. There are many small, hand-held devices that are perfect for this. Use Hair Removal Tools Turn to handy tools like sticky rollers and furniture brushes between vacuuming sessions. Oversized sticky rollers or those with extendable handles are particularly effective on upholstered furniture, covering more surface area with each pass. Common Household Items You don't always need specialty tools to combat pet hair. Everyday household items can be just as effective. A straightforward method is to put on a rubber glove, dampen it, and run your hand over the sofa's surface, causing the hair to ball up for easy pickup and disposal. Groom Your Pets Prevention is a great way to keep your furniture pet hair-free. Regularly groom your pet with guidance from your vet or groomer to reduce shedding and maintain a healthy coat. Grooming gloves, which help reduce shedding and straighten hair follicles, can effectively remove pet hair from your couch. Now what? Vacuuming, hair removal tools, everyday household items, textile preparation, and regular grooming of your furry companion can make all the difference in keeping your furniture fresh and comfortable for you and your pets. But there’s more! Don’t forget that removing pet hair is just part of maintaining your furniture. Having your furniture professionally cleaned on a regular basis is recommended. Do the right thing and call your favorite cleaning company now for an appointment. After all, it pays to call a pro! Cleaning Up After the Holidays
Cleaning up after the holidays (or any party) can be challenging, especially when dealing with decorations, leftovers, and the general aftermath of festivities. Here are five good cleaning tips to help you tackle the post-holiday mess effectively: 1. Declutter First: Start by decluttering your home. Begin with the holiday decorations, taking them down and packing them away carefully. Dispose of any broken or worn-out decorations. Also, go through gifts, wrapping paper, and packaging materials to recycle or properly store them. Clearing out the clutter will make the cleaning process more manageable. 2. Deep Clean Your Kitchen: The kitchen is often the heart of holiday gatherings and can accumulate dirt and grime. Focus on cleaning your appliances, countertops, and sink thoroughly. Remember to clean the oven and microwave if you've done a lot of cooking. Wipe down the cabinets and mop the floors. Dispose of any leftover food items that have gone bad, and then organize your pantry and fridge. 3. Tackle Stains and Spills: Holiday celebrations can lead to spills and stains on carpets, upholstery, and tablecloths. Act quickly to clean up any spills, using appropriate stain removers or gentle cleaning solutions for delicate fabrics. Steam clean carpets and rugs if necessary. Launder and spot-treat table linens and cloth napkins to remove food or drink stains. 4. Bathroom Cleanup: Bathrooms can be used often during holiday gatherings. Disinfect and clean the toilet, sink, and bathtub or shower. Replace any used or empty toiletries like hand soap and toilet paper rolls. Wash and replace guest towels and empty the bathroom trash cans. 5. Dust and Vacuum: Dust and vacuum your entire home after the decorations are down and the clutter is cleared. Pay special attention to areas that may have accumulated dust during the holiday season, such as shelves, mantels, and corners: vacuum upholstered furniture, curtains, and blinds to remove any lingering dust or pet hair. Bonus Tip: Divide tasks among family members to make the process faster and more efficient. Put those kids to work! Following these cleaning tips, restore your home to its pre-holiday cleanliness and start the new year with a fresh, organized living space. And when you really need some serious help with any cleaning task, such as carpet, upholstery, tile and grout, do the right thing. Call your favorite cleaning company. After all, it pays to call a pro! 5 Keep it Clean Tips
Keeping your house clean for an extended period involves a combination of daily routines and smart strategies. A tidy home looks appealing and contributes to a healthier living environment. Here are five practical ways to help your house stay cleaner for longer: 1. Establish a Cleaning Routine: Consistency is critical. Set up a cleaning schedule that aligns with your lifestyle. Daily tasks like making the bed, washing dishes, and wiping down countertops can help prevent clutter and dirt buildup. Weekly and monthly tasks, such as vacuuming, mopping, and dusting, should be integrated into your routine. Sticking to a schedule will prevent messes from accumulating and becoming overwhelming. 2. Declutter Regularly: The less stuff you have, the easier it is to keep your home clean. Go through your belongings periodically and declutter by donating or discarding items you no longer need. Implement a "one in, one out" rule to remove an old one when you acquire new possessions. Reducing clutter means less dust and fewer areas for dirt to hide. 3. Use Doormats and Shoe Racks: Place doormats inside and outside your entrances to trap dirt and debris from shoes before entering your home. Implement a no-shoes-indoors policy or provide a designated shoe area near the door. This will significantly reduce the amount of dirt and grime tracked through your house. 4. Invest in Quality Cleaning Tools: Quality cleaning tools can make a big difference. Invest in a good vacuum cleaner with a HEPA filter to remove dust and allergens effectively. Microfiber cloths and mop heads are excellent for trapping dirt and are easy to clean. Additionally, consider using eco-friendly cleaning products to maintain a healthier home environment. 5. Practice Preventative Measures: Preventing messes in the first place is one of the best ways to maintain a cleaner home. Business covers on furniture to protect against spills and stains. Use coasters for drinks to prevent water rings on tables. Encourage family members and guests to use trays or placemats when eating in common areas. By implementing these small preventative measures, you can reduce the likelihood of dealing with extensive cleaning tasks later. We all know a clean home requires dedication and organization. And when you need specialty cleaning, such as for carpet, upholstery, or other cleaning tasks, call your favorite cleaning company. After all, it pays to call a pro! A Sticky Issue: How to Remove Gum
Despite its refreshing taste and breath-freshening abilities, chewing gum often finds its way onto and into places it doesn’t belong, stubbornly sticking to surfaces and creating a mess. Fortunately, removing gum isn’t terribly tedious if you know the proper methods. Chewing gum is challenging to remove when warm, so hardening it is the first step in any gum removal process. This can be achieved by using ice cubes or freezing the gum-adhered item, making removing it easier without stretching or damaging the underlying surface. Fabric, carpet, and rugs For fabric, carpet, or rugs, apply an ice cube directly to the gum, rubbing it until it hardens. Placing the gum in the freezer is an efficient alternative if it is on a small, portable item like an item of clothing. Consider putting the ice cube in a plastic bag for rugs or carpet to avoid soaking the material with water. Once the gum hardens, gently scrape it off using a blunt knife, like a dinner or putty knife. Though it requires effort, being cautious can help avoid damage to the fibers. Hair Removing gum from hair necessitates a slightly different approach. Instead of hardening the gum, applying cooking oil or another natural lubricant (some use peanut butter) can ease the removal process. Gently work the substance into the gum and surrounding hair before carefully picking or combing out the gum. This method requires caution, especially when working on someone else, as it can be painful. Alternatively, one can use the freezing process to ‘crack’ the gum off, followed by an oil treatment to remove all remnants. Persistence Regardless of the method used, removing gum demands patience and careful handling. Sometimes, it may require combining techniques, especially for more stubborn pieces. However, diligent application of these methods usually results in successful gum removal, leaving the surface unharmed. By approaching this sticky situation with patience and the proper techniques, you can ensure that the unwelcome gum finds its way out without leaving a trace behind. But at times this type of sticky situation is just too much to handle on your own, such as when gum is embedded and hardened into your carpet or expensive area rug. When that happens, you have a resource you can rely on: Your favorite cleaning company. Do the right thing and let them handle this. After all, it pays to call a pro! |
Absolute Best Tile and Carpet Cleaning Wilbraham MA
Cleaning OutPost Site Wilbraham MA
May 2024
|


 RSS Feed
|
|
Would you like to get your own OutPost Site? Cleaning and restoration firms who are MarketingZoo.com members get
|
CleaningOutpost.com Directory of Cleaning & Restoration Businesses is a service offered by MarketingZoo.com
Copyright 2015 Thinkshortcut Publishing, LLC
Copyright 2015 Thinkshortcut Publishing, LLC