|
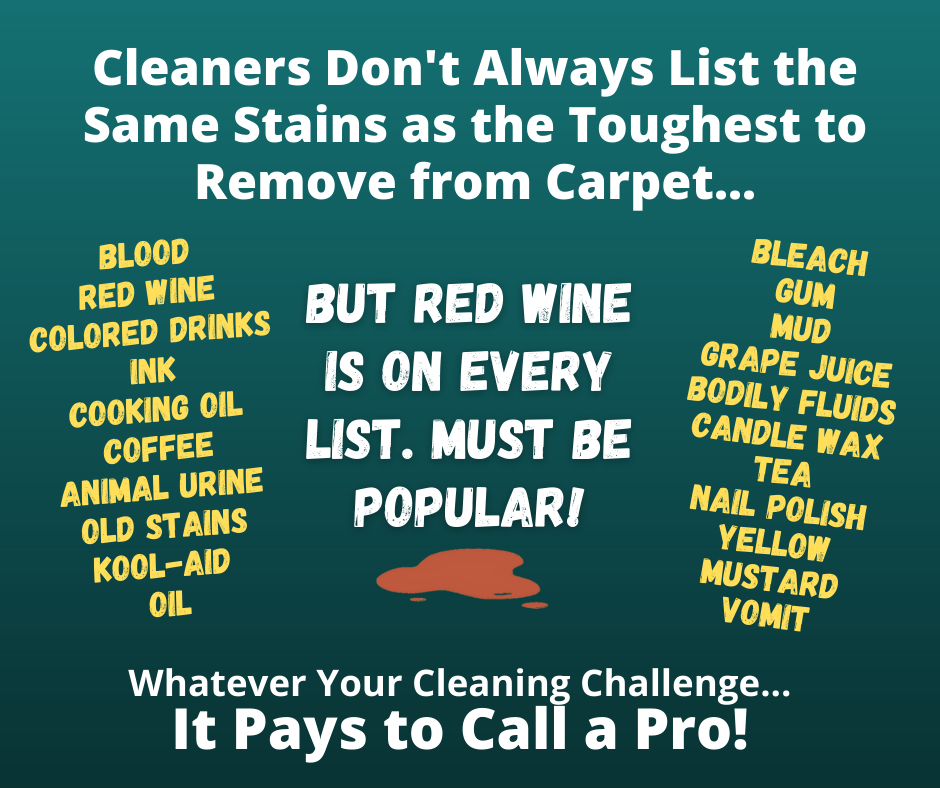
How to Remove Ink Stains from Clothes
Has this, or something similar, ever happened to you? You put on a nice, fresh shirt and head out the door. When you arrive at your destination and are chatting with friends or colleagues, someone points at your shirt and asks, “What’s that?” You look down, and a small blue or black spot is starting to grow. That’s right, the ink pen in your pocket is leaking. Or perhaps your nice, fresh shirt or other item of clothing has a small spot on it, and you learn it was from simply touching an ink pen to your shirt and the ink transferred to it. It’s small, but everyone sees it. An embarrassing moment, one you wish you could have avoided. This type of stain doesn’t just wipe off. It takes a lot of effort to remove an ink stain, and if you don’t do it right, you will just make the situation worse. Ink spreads and migrates out, creating a bigger stain as you work on it. While not an easy task, here are some tips to make ink stain removal a little easier for you. But remember, this isn’t typical cleaning, it’s aggressive, so there is always the chance of damaging the fabric. Hair spray: Using an aerosol version, alcohol-based, apply liberally to the stain. Work it in and dab at it with a white paper towel. Hair spray sometimes works because the alcohol disperses some inks. Wash immediately. Acetone: The ingredient in traditional nail polish removers, acetone is a very dry solvent that will work on ink. When you saturate the ink stain, it will dissolve and migrate so be ready for that, working your way from the outside in, to limit spreading. In addition to acetone, other liquid dry solvents, such as rubbing alcohol, can be used. After application, wash immediately. Detergent treatment: Use a product meant to pre-treat laundry and apply to the ink stain liberally, work it in, from the outside in to limit spreading, and then wash immediately. No matter the type of treatment you use, washing the garment will help remove more of the ink. Be sure to wash separately, and do not dry the garment until you are satisfied with the ink removal results. When you dry an item of clothing, attempting to remove more of the stain is often futile. And remember that true fabric cleaning experts know how to remove ink stains. When you have a challenging cleaning situation, do the right thing. Call your favorite cleaning company. After all, it pays to call a pro! How Evaporation Works
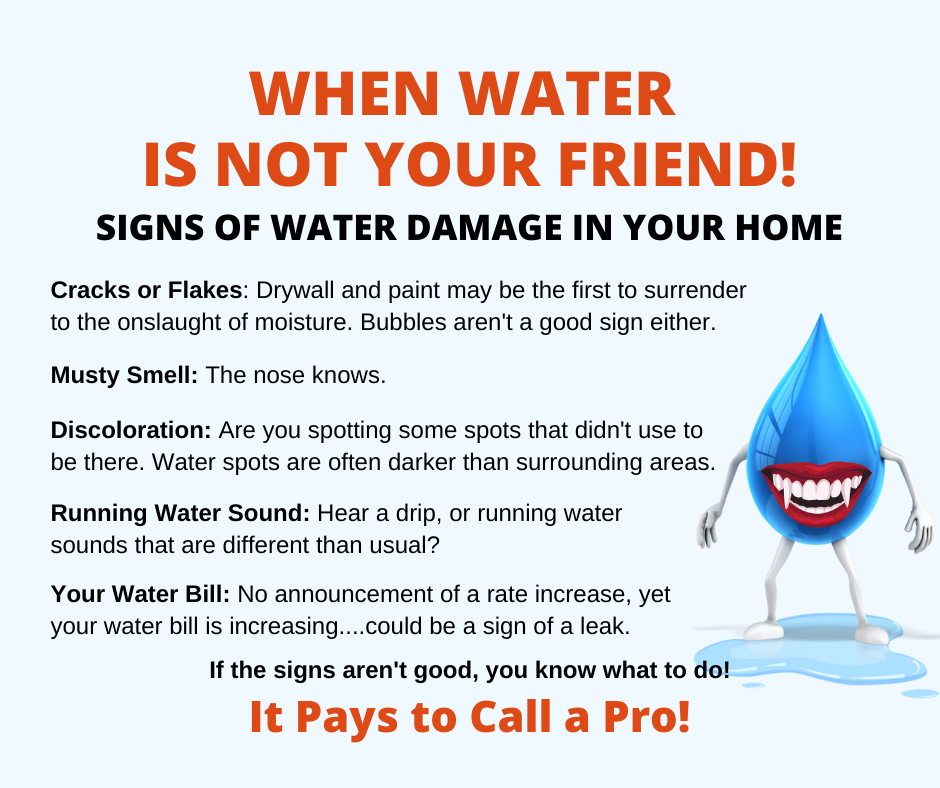
When something gets wet or damp from water damage in your home or even at work, the longer it is wet or damp, the worse the damage over time. Evaporation, while a simple principle we all benefit from every day, is an important scientific concept that you can manipulate to work better for you. First to consider is what evaporation is… it’s an activity that occurs when a liquid substance turns into or becomes a gas. Think about when you boil water, and you hold a glass above the pot. What happens? The glass gets wet. That’s because evaporation is occurring in the pot and the gas is moving up onto the glass you are holding. You also see condensation on windows. That’s because evaporation put water into the air as a gas and now it is coming back to a surface. Many energy sources increase the rate of evaporation, such as when you put a wet item outside on a sunny day. For evaporation to occur, the surface of the water must be exposed so there can be an escape of moisture. For any water damage situation in your home, exposing wet or damp areas is critical. Running a fan on an object that has moisture inside, and the air can’t get to that area, is worthless. This is why a professional water damage company will work to expose all wet or damp areas affected by a flood or leak and allow that moisture to escape — into the air and then into a dehumidifier. The more energy you apply to a wet area, the better the evaporation. You must remove the moisture from damaged items, building materials, and other affected areas to avoid a musty smell and mold that can develop in a short amount of time. That energy can come in the form of air movement (running a fan), adding heat (professional restoration companies use this technology) and ventilation (opening windows so air can move, running the air conditioner or furnace system). Really, although evaporation is a simple process and we rely on it (imagine if you never dried off after a shower!), it is also a science. When anything gets wet in your home that shouldn’t, don’t wait for things to dry on their own. At minimum, contact your favorite disaster restoration company and ask them what they think you should do. After all, it pays to call a pro! Cleaning Up the Medicine Cabinet
Although springtime is generally the accepted time of the year to clean out the medicine cabinet, it is something you should do on a more regular basis. Medications, drugs, and other items can expire between annual cleanings, and it’s important to keep on top of what makes you healthy and happy. If you take a peek inside your medicine cabinet, you will find all types of items, some of it medicine, some of it not. Look at all expiration dates, from prescription drugs to over-the-counter products, toothpaste, sprays, and more. Here are a few quick tips to consider as you start rummaging around in your medicine cabinet (or wherever you tend to store your products): Date check: Look at the expiration of everything in the cabinet. Although it is generally accepted that the expiration date is usually before items become obsolete, it’s safer to go by the date. Discard any items beyond the expiration date. Quality: Look at how your items are stored. If not in airtight containers, the quality may have taken a hit. Look at the color, check the consistency… is it the same as when you purchased these items brand new? If not, it’s time to replace them. Unmarked goods: Some people like to put things in baggies and other containers that aren’t marked. If you aren’t 100% sure of what’s in that baggie, discard it. Be safe. Discarding items: Just throwing drugs, pills, and other items into the toilet is a bad habit. Flushing it away might damage the environment. Instead, properly dispose of any items that you are replacing in the trash, preferably in a sealed bag in case the trash spills or moisture gets into what you are discarding. That can cause an unwanted reaction (rare) or create an odor (more common) that you might find distasteful. The big picture: Although items that are beyond their expiration date may not harm you if you use them, they may not help you, either. The effectiveness of the item diminishes over time, and if you consume products that aren’t helping you, you are wasting your time. And when it comes to cleaning anything in your home, it’s always a good idea to consult a cleaning expert. Call your favorite cleaning company today with any questions you have. After all, it pays to call a pro! Where There’s Mold…
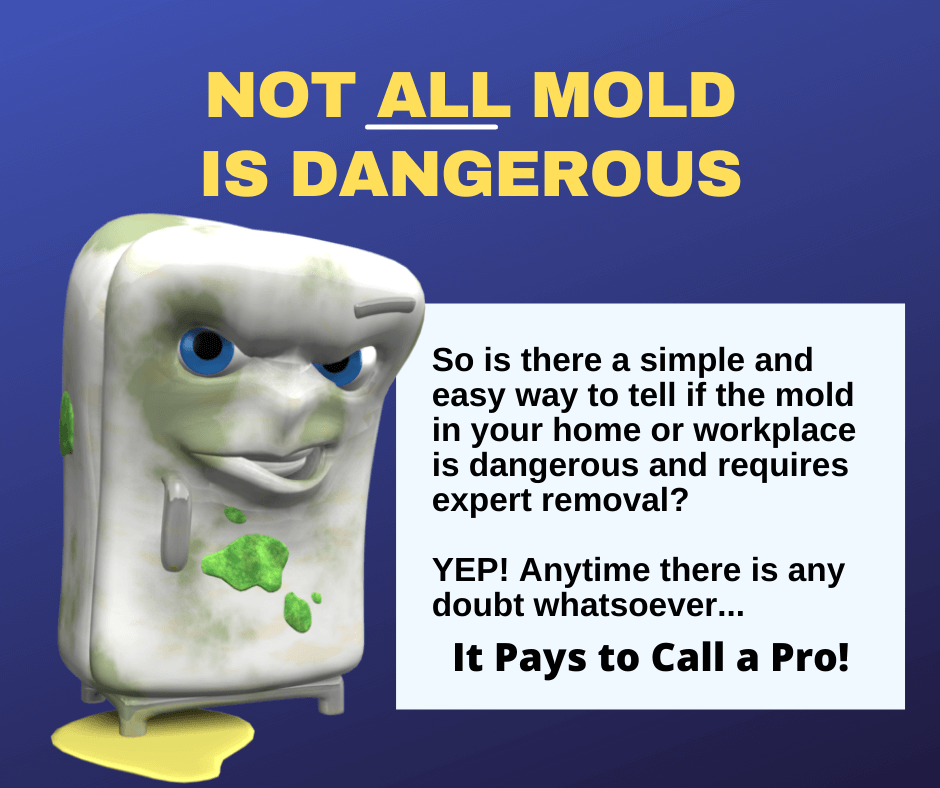
Where there’s mold, there is usually an underlying condition that you must discover and remediate, and quickly. Mold occurs because of conditions that allow it to grow, and some types of molds are tenacious. Recently, we considered the difference between mildew and mold and what the EPA has to say about what we need to know. And while the cleanup of mold and mildew may seem basic at times, there are situations when removal and cleaning can be challenging to tackle. Here are some important points to consider and remember… to play it safe means consulting and usually hiring a professional mold remediation company. Toxic or non-toxic? Mold is a common problem and as a fungus it can appear in different areas for many different reasons. Usually because of a dark, moist condition. But just because you find mold doesn’t mean it is necessarily toxic. After all, everyone has different reactions to substances. What may be harmful to one person may not be to another. But always be safe and when cleaning up mold, wear gloves, a respirator, and proper personal protective equipment that a mold remediation expert would recommend. Most molds Most of the time, the mold you find, such as in a bathroom, a windowsill, or other common areas, can be easily cleaned. It is unlikely you will call a mold remediation expert to take care of the mold growing on the grout in your shower. Just be safe and wear a mask and gloves, and use products designed for removing small amounts of mold. Mold is a type of soil. It’s organic growth. No need to panic, just be smart about cleaning it up. After all, if you were in the garden and saw some mold, you wouldn’t run screaming into the house. Simply applying a cleaning product for mold and mildew removal, scrubbing and wiping it up, completely, often fixes the issue. But sometimes, the mold has grown into surfaces, such as baseboards, walls, or even the subfloor that you discover as you replace flooring material. When that occurs, removing and replacing affected areas is often the best solution. Hiring a pro If the mold appears significant, and you have some doubts on removing it, it’s best to call a professional. A mold remediation company utilizes technicians who are trained and have experience in safely removing larger amounts of mold, or the types of mold that are known to affect more individuals with mold allergen sensitivities. Who pays for all of this? Sometimes, your insurance company, if the cause of the mold is from a water damage situation. Talk to your favorite restoration company about all of this. After all, it pays to call a pro! How to Fix the Mess in the Microwave
There is no greater compliment to your cleaning skills than someone commenting that your microwave oven is the cleanest they have ever seen. You’ve never heard someone say that about the microwave in your kitchen? Then let’s get to work! Microwaves are known to be messy. After all, they are designed to warm up food, and usually, that involves spills, spatters, and for some food items, explosions. Who hasn’t put something in the microwave to heat it up only to hear that dreaded POP as it expanded and flung remnants all over the inside of the oven? Some of you may be diligent with covering up food you are warming, but most of us… just hope for the best. And when that fails us, here are a few practical tips to a perfectly clean microwave oven. Start smart The first step to cleaning a dirty microwave oven is to wipe up as much excess food particles you can. Spraying them just means a smeary mess. Use a dish cloth or paper towels to remove food particles, paying special attention to the inside of the door and corners, where particles can build up over time. Steam it up Nothing works better than a little preparation. Take an uncovered bowl of water and put it in the microwave and cook it for two or three minutes. The steam and heat of the water will help loosen the grease and remaining food particles for easier removal. This head start is a very smart way to clean your microwave oven. Wipe it all down It’s best not to spray the interior with just any cleaning solution. What you smell might end up in your food. Residues and odors can affect the next dish you prepare. Instead, use a cloth, hot water, and dish detergent as your cleaning arsenal. With the dampened cloth, wipe away greasy residues and food particles, repeating often until you have a squeaky-clean surface. You can also put the dampened cloth on really stubborn areas and allow the detergent to work a few minutes and then wipe it away. When you are done, dry it all with fresh towels and inspect, recleaning any areas of concern. Of course, to really get something clean in your home, do the right thing. Call your favorite cleaning company. After all, it pays to call a pro! The Often-Forgotten Vacuum Bag
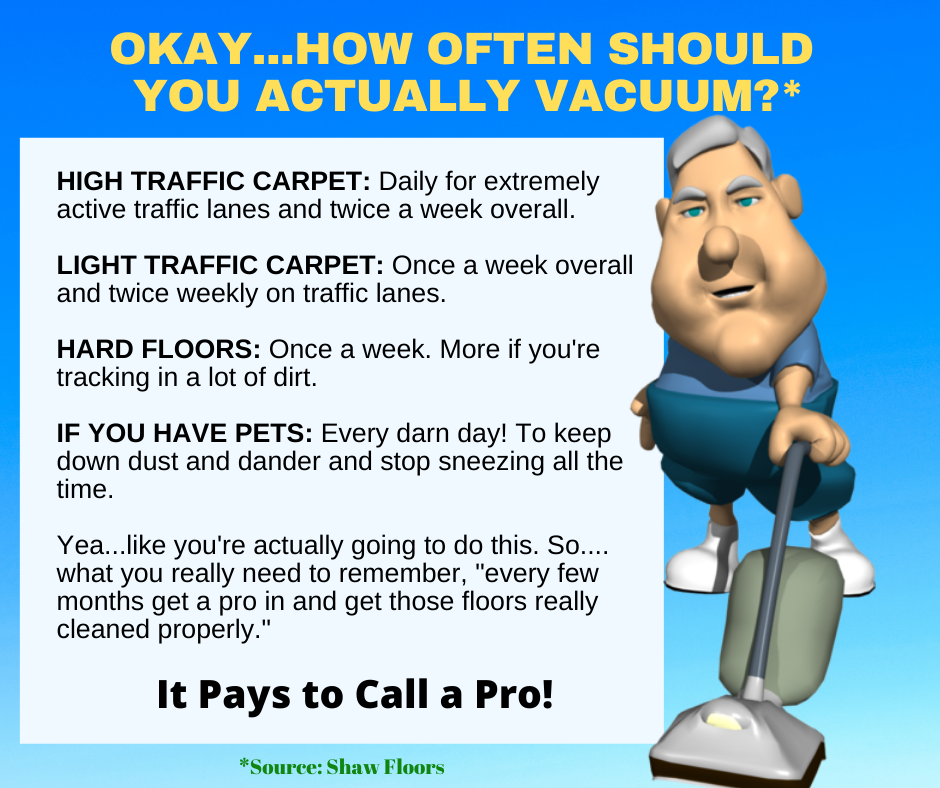
Vacuum cleaners are an integral part of life for any family and a common tool used daily in commercial buildings. While the vacuum hums along doing its job, picking up dirt, grit, debris, and potential contaminants, there is a part of the vacuum we might not think about that often. You usually can’t see it… but it’s right there, inside your vacuum cleaner — the bag. The vacuum bag is the repository of all substances that the vacuum collects through the beater bar or suction assembly and hoses. Unless you use a bagless vacuum, and there are some on the market today, all air goes from the surface being vacuumed and through the vacuum bag. The air you breathe around a vacuum is partly the air that has passed through the unit. Problem detected You know you have a problem when you turn on the vacuum cleaner and notice a foul odor. What you are detecting is the result of organic and inorganic matter inside the vacuum bag that has had time grow microorganisms that create odors. A vacuum bag that has sat a long period of time without being changed or cleaned can produce significant bad odors. While your vacuum cleaner manufacturer will have recommendations on the frequency of changing the bag, those are simply general recommendations. Professional carpet cleaners recommend changing a bag when one-half to two-thirds full. Is that enough? The nose knows In addition to following a schedule, use some common sense. Remember that a vacuum bag in the dark that is stuffed with organic soils will quickly become an odor-causing source. If you vacuum every day, you may not notice it. But give it a week or two, and the odors become evident. At the first hint of an odor, change the bag. Even if you vacuum once or twice, and put the vacuum away for several days, it may be good to change the bag before using it again. Bags are cheap. Your health is not. Professionals cleaners often change the vacuum bag and clean all equipment before going from one home to the next. The do this to avoid cross-contamination. Their basic principles of equipment maintenance keep you and your family safe. When it comes to the absolute best cleaning of all surfaces, do the right thing. Call your favorite cleaning company. After all, it pays to call a pro! |

 RSS Feed
|
|
Would you like to get your own OutPost Site? Cleaning and restoration firms who are MarketingZoo.com members get
|
CleaningOutpost.com Directory of Cleaning & Restoration Businesses is a service offered by MarketingZoo.com
Copyright 2015 Thinkshortcut Publishing, LLC
Copyright 2015 Thinkshortcut Publishing, LLC